
Immunofluorescence (IF) specimen preparations can be analyzed by various fluorescence microscopy techniques, depending on the research application. IF is indispensable for researchers using a simple fluorescence microscope. The centerpiece of IF is a combination of two different components:
- specific antibodies used to form an immune complex to mark the desired cellular molecules, often proteins, and
- fluorochromes coupled to immune complexes which allow the target structures to be visualized.
Typical workflow
This chart illustrates a typical workflow of indirect immunofluorescence (IF) with epithelial cells adherently growing on coverslips. After cultivation, cells get fixed and therefore killed with a chemical crosslinker (e.g. formaldehyde). Next a permeabilization step with detergents is performed to enable the antibodies to cross the cellular membranes. Blocking with normal serum, milk powder or bovine serum albumin reduces the unspecific binding of antibodies to non-target structures in order to minimize false-positive signals. Next the incubation with the first antibody takes place, which specifically recognizes epitopes on the target molecule. In a second incubation step the fluorescence-coupled secondary antibody is applied which binds to the first antibody and therefore visualizes the target structure. After antibody incubation, nuclei staining is performed with dyes such as DAPI or Hoechst which intercalate into DNA. After mounting of the coverslip with a mounting medium (e.g. Mowiol or Prolong Gold) on a microscope slide, the IF preparation is ready for microscopy.
 with epithelial cells adherently growing on coverslips.")
Direct vs. indirect immunofluorescence (IF)
Depending on the type of experiment there are two different IF variants: In direct or primary IF a specific primary antibody which is linked to a fluorochrome is used for binding to the target structure and its direct visualization.
In the second variant, referred to as indirect or secondary IF, a two-step incubation is performed. Firstly, a specific primary antibody recognizes the target structure. Then a fluorochrome-coupled secondary antibody is applied which specifically binds to the primary antibody. This specificity is obtained by directing the secondary antibody against the species in which the primary antibody was raised (see Antibodies and fluorochromes). Comparing the two Immunofluorescence variants, each of them has different advantages and drawbacks:
By coupling the primary antibody with a fluorochrome, direct IF is faster than the indirect version as time-consuming washing and incubation steps are omitted. Thus, direct IF is easier to handle and therefore suitable for the rapid analysis of samples in standardized IF experiments, for example in clinical practice. However, it is essential to employ a well-functioning primary antibody with high affinity to its antigen. This is simultaneously a negative aspect, as fluorescence-coupled and validated primary antibodies are expensive. Moreover, you need a separate primary antibody for each target structure, and the linkage of the antibody with a fluorochrome in direct Immunofluorescence restricts your flexibility in designing your experiment in comparison to indirect Immunofluorescence.
This flexibility is a significant advantage of indirect IF. Usually, several different target structures in the same specimen need to be visualized during one Immunofluorescence reaction, therefore a discrete fluorochrome must be selected for each target molecule. In indirect Immunofluorescence, different fluorescence-coupled secondary antibodies can be combined with different primary antibodies (considering the species reactivity, of course). In contrast, if you want to "play" with color combinations of your target structures in direct Immunofluorescence, you need an individual primary antibody for each color. Another advantage of the indirect method is signal amplification by the secondary antibody. Multiple secondary antibody molecules can bind to one primary antibody, which leads to an increase of fluorescence, meaning that less primary antibody has to be applied.
The workflow of indirect IF may take more time, but due to the possible combinations of primary and secondary antibodies and a generally more economical procedure it is the method of choice for most researchers.

In direct Immunofluorescence (IF) the first antibody is directly linked to a fluorochrome which visualizes the target structure under the microscope.
In indirect Immunofluorescence (IF) a fluorescence-coupled secondary antibody is applied during a second incubation step which specifically labels the first antibody. This leads to a greater flexibility in choosing antibodies and fluorochromes and furthermore to a signal amplification, because several secondary antibody molecules can bind to one primary antibody.
Antibodies and fluorochromes
The most crucial tool for an IF staining of high quality is a good primary antibody. Meanwhile, one or even several commercially purchasable antibodies are available for approximately each protein in almost every cell type. However, there are a few extremely important things to note here.
To make a precise scientific or clinical statement based on your IF staining you must ensure the specificity of your primary antibody to its target antigen. In doing so you should not exclusively rely on the statements of your commercial providers. Choose your antibody according to already used and validated primary antibodies in literature on the subject. Check the antibody’s datasheet on the manufacturer’s website for available pictures of IF staining stainings and compare them with your expectations or other published illustrations. Take notice of the antibody’s clonality, as monoclonal antibodies specifically bind to only one epitope, whereas polyclonal antibodies recognize several epitopes, making non-specific labeling of non-target structures more likely. Therefore, monoclonal antibodies with their high specificity and good affinity are usually more expensive, but they also achieve better results.
If you want to perform multicolor indirect IF staining, the different primary antibodies must derive from different species in order to distinguish the immune complexes by labeling with fluorescence-coupled secondary antibodies afterwards (see Table 1). Say, for example, you are performing IF staining with antibody anti-protein A derived from mouse, antibody anti-protein B from rabbit and antibody anti-protein C from rat. When choosing the secondary antibodies you have to remember that each of them specifically recognizes only one primary antibody. Furthermore, the fluorochromes in this example of the three secondary antibodies must differ in their wavelength spectrum to discriminate their fluorescence signal in microscopic analysis. Nowadays, secondary antibodies linked to fluorochromes with a wavelength range from ultraviolet to infrared against primary antibodies from almost any species are purchasable. Thus the researcher is only limited by the configuration of the available microscopes (filter sets, excitation lasers).
|  |  |  |
|---|---|---|---|
| Target protein | Protein A | Protein B | Protein C |
| Target species | Human | Human | Human |
| First antibody | Anti-Protein A | Anti-Protein B | Anti-Protein C |
| First antibody species reactivity | Mouse anti-human | Rabbit anti-human | Rat anti-human |
| Second antibody species reactivity | Goat anti-mouse | Goat anti-rabbit | Goat anti-rat |
| Fluorochrome excitation/emission | 490/525 nm | 556/573 nm | 650/665 nm |


Tab. 1: This example of a multicolor indirect Immunofluorescence demonstrates how to label simultanously three different proteins in the same cell. The three first antibodies must derive from different species in order to detect them with three different fluorochrome-coupled secondary antibodies. The secondary antibodies’ fluorochromes must differ in their wavelenght spectrum for a distinct analysis in the microscope. The cell depicted in the sample image was also treated with Hoechst 33342 for nucleus staining. Microscopy was performed on a Leica confocal microscope.
Specimens
IF protocols exist for a variety of different specimens or samples. The simplest and most commonly used method is the staining of cultured (eukaryotic) cells from cell culture. Adherently growing cells can be seeded on coverslips, multiwell-inserts or directly on glass bottom culture dishes and used for IF at the desired time. IF is also possible with suspension cells after application of the cells to an object slide, e.g. by cytospin. In both cases, the focus is on the analysis of intracellular processes or structures, and this is designated immunocytochemistry (ICC).
In immunohistochemistry (IHC), on the other hand, the presence of proteins or molecules is examined in a tissue-specific context. Here, ultrathin sections of organ preparations (usually embedded in paraffin wax) are used to e.g. investigate the expression of proteins in a healthy organ compared to a diseased one. In addition to the preparation of tissue sections it is also possible to perform IF with whole organisms, a process referred to as "whole mount IHC". For this purpose, embryos of different model organisms such as mouse, chicken or zebrafish, for instance, or plant model organisms like Arabidopsis thaliana are used. In whole mount IHC one is limited by the size of the specimen and the associated penetration depth of the IF reagents. The separate incubation steps take longer than the staining of cultured cells. Also, microscopes with special optical equipment for the analysis of large specimens have to be available.
 staining of a human kidney displays different cell types in different structures")
 image shows staining of two proteins in cells of the same type (MDCK) by indirect Immunofluorescence (IF)")
Fig. 3: a) The immunhistochemistry (IHC) staining of a human kidney displays different cell types in different structures (e.g. Glomerolus, proximal tubule, distal tubule). The expression of the protein labeled with a green fluorochrome is limited to a specific cell type, whereas the red-labeled protein is widely expressed. b) The immuncytochemistry (ICC) image shows staining of two proteins in cells of the same type (MDCK) by indirect immunofluorescence (IF). Here, a tissue-specific study is not possible, but the analysis if both proteins colocalize in the same structure. Both samples were treated with Hoechst 33342 for nucleus staining. Microscopic examination was performed with a Leica confocal microscope.
Washing steps
Special attention should be paid to washing steps during an Immunofluorescence procedure, because IF quality can be increased by proper washing. PBS is a standard washing buffer, whereas variants such as PBS++ or PBS-T are also prevalent. PBS++ contains 1 mM CaCl2 and MgCl2, which is presumed to have a membrane-stabilizing effect preventing cell detachment. For PBS-T a final concentration of 0.05 % of the detergent Tween 20 is added with the aim of increasing the binding specificity of the antibodies. It is extremely important to apply and aspirate the washing buffer carefully so as not to detach the cells from their culture vessel or coverslip. If you have enough time, allow several minutes for washing between the aspiration steps to ensure efficient diffusion of the washing buffer into the specimen. The individual washing steps of an IF procedure are listed in the standard protocol below.
Fixation
Fixation is the first step of an Immunofluorescence procedure. The goal is to maintain cells, cellular formations or tissue in their current state and to preserve the preparation by chemical reagents over an extended period. During fixation it is important that cellular structures remain in their native conformation as far as possible. Different fixation methods are useful for IF, with each reagent having a different effect on the primary antibody’s epitopes. Antibody binding sites can be masked or also damaged by fixation, which impairs the quality of IF staining. Since each antibody binds differently to its antigen dependent on the various fixation compounds, it is necessary to try several fixation methods for a new antibody. Often, specifications for a suitable fixative can be found on the antibody’s datasheet. The ideal fixation conserves the cellular and subcellular architecture and provides unblocked antigens for good antibody binding. In reality, you have to strike a balance between the two.
Fixation reagents can be roughly divided into two groups: chemical crosslinkers and organic solvents.
- Chemical crosslinkers such as formaldehyde crosslink proteins via their free amino groups; the cellular morphology is well preserved in most cases. However, the antigens are also crosslinked, which might reduce antibody binding. Glutaraldehyde also has a preservative effect on cellular structures, but results in high autofluorescence of the specimen in microscopy.
- Organic solvents like methanol or acetone have a dehydrogenating effect and precipitate proteins, thereby fixing them in their cellular context. But remember that soluble molecules and many lipid components are lost in the process. Frequently, a combination of methanol and acetone is used, because although methanol is best for the preservation of cellular structures, it has an extremely negative impact on many epitopes. Acetone is less damaging here. You should also consider that fluorescent proteins such as GFP, which are already present in your cells, will be largely destroyed by fixation with organic solvents. If the manufacturer of the primary antibody does not propose a fixative, starting with 4 % formaldehyde for 10 minutes at room temperature is suitable for various cell lines and antigens.
Permeabilization
By permeabilization, intracellular structures become accessible for antibodies which are otherwise unable to pass through the lipid membranes of the cell. A separate permeabilization step is necessary, depending on the type of fixation. When fixing with organic solvents, cellular membranes become already permeable and you can directly proceed to blocking. Cells fixed with chemical crosslinkers require additional treatment with a detergent for permeabilization. Classical detergents like Triton X-100 or NP-40 are applied, but saponin, tween 20 or digitonin may also be used. Again, various results are obtained, depending on the applied substance, its concentration and incubation time, so you should try different parameters at the beginning. A typical start represents a permeabilization with 0.1 % Triton X-100 in PBS for 15–20 minutes at room temperature.
If you want to analyze lipid-associated or membrane proteins by IF, you should carry out the permeabilization step (= lipid removement) carefully. A good choice for this purpose is saponin, which selectively removes cholesterol from the plasma membrane, leaving intracellular membranes largely intact. If permeabilization is omitted before antibody staining (only possible by fixation with chemical crosslinkers), you can specifically mark extracellular plasma membrane-bound antigens in order to distinguish them from the intracellular antigen pool. Nucleic acid dyes such as DAPI or Hoechst are membrane-permeable and do not require permeabilization.
Blocking
Blocking is an important step for minimizing unspecific binding of the primary antibody within the cell. To achieve this, proteins from Bovine Serum Albumin (BSA), milk powder or serum can be used. It is important that these blocking proteins do not originate from the species in which the primary antibody was raised, otherwise the secondary antibody’s specificity to the primary antibody will be lost. If you use a secondary antibody, e.g. one produced in goat against a murine first antibody, an ideal blocking reagent is normal goat serum. Blocking solutions are normally utilized in concentrations of 1 % (milk powder, BSA) to 5 % (normal serum) and diluted in wash buffer. The incubation takes place at room temperature for 30–60 minutes.
Immunoreaction
After sample preparation by fixation, permeabilization and blocking, the actual immunoreaction occurs. The samples are now incubated with the specific primary antibody to mark the desired target structures. Several primary antibodies can be applied to the specimen at the same time. As mentioned above, several primary antibodies have to originate from different species in indirect multicolor IF. The antibody dilution is performed in your selected blocking solution, initially according to the manufacturer. If you are dissatisfied with your staining, or if the manufacturer does not provide any information on a working dilution, you should try concentrations between 1:50 to 1:1,000. Depending on the antibody’s affinity the incubation time can vary. Default incubation times are 1–2 hours at room temperature; overnight incubation at 4 °C is also possible.
If you perform direct IF you can directly continue with sample mounting, as the primary antibody already brings its own fluorochrome. In indirect IF the secondary antibodies now fluorescently label the primary antibodies. A crucial point here is extensive washing after incubation with the primary antibody to reduce unspecific binding of the secondary antibody. The secondary antibody may also be diluted in blocking solution or wash buffer. If not denoted differently by the manufacturer you can start with a dilution of 1:200 and incubation for 1 h at room temperature. It is necessary to carry out the incubation steps in darkness to prevent fluorochrome bleaching.
Nucleus staining and sample mounting
The immunoreaction is often followed by a nucleus staining with DNA dyes. On the one hand, this enables better orientation within the cell or tissue sections during microscopy and on the other it indicates the cellular status (e.g. mitosis), if this is of interest to the researcher. Dyes such as Hoechst or DAPI, which enter the nucleus even without permeabilization and intercalate into the DNA, are used for this. For this reason you should be very careful to avoid direct skin contact with these dyes! A simple nuclear staining takes place for 10 minutes at room temperature with Hoechst or DAPI diluted in PBS.
After completing the IF procedure, the samples must be mounted to be suitable for microscopy. For this purpose a mounting medium (e.g. Mowiol or Prolong Gold) is used which fixes the sample on a microscope slide and which also prevents its dehydration. In addition, mounting media increase the refractive index, which is conducive for microscopy with oil immersion objectives. Several manufacturers offer mounting media with additives such as DABCO, an anti-fading agent which protects the sample from photobleaching. Depending on the fluorochromes used, some anti-fading agents are more effective than others. Furthermore, mounting media with added DNA dyes are also available, so that the nuclei are stained during embedding and a separate nuclei staining is redundant. If a hardening mounting medium is used, which is often the case, the sample is allowed to cure overnight, so microscopic examination is possible on the following day. Permanent preparations produced in this way can be practically unlimitedly stored in the dark at room temperature or 4 °C, but remember that the fluorochromes’ fluorescence intensity diminishes over time.

Figure 4: Adherently grown epithelial cells (MDCK) were cultured on coverslips, fixed, and nuclei stained with Hoechst 33342. Most cells showed interphase DNA staining, but some cells showed chromosome condensation and these chromosomes segregated in mitosis (asterisks). Microscopic examination was performed with a Leica confocal microscope.

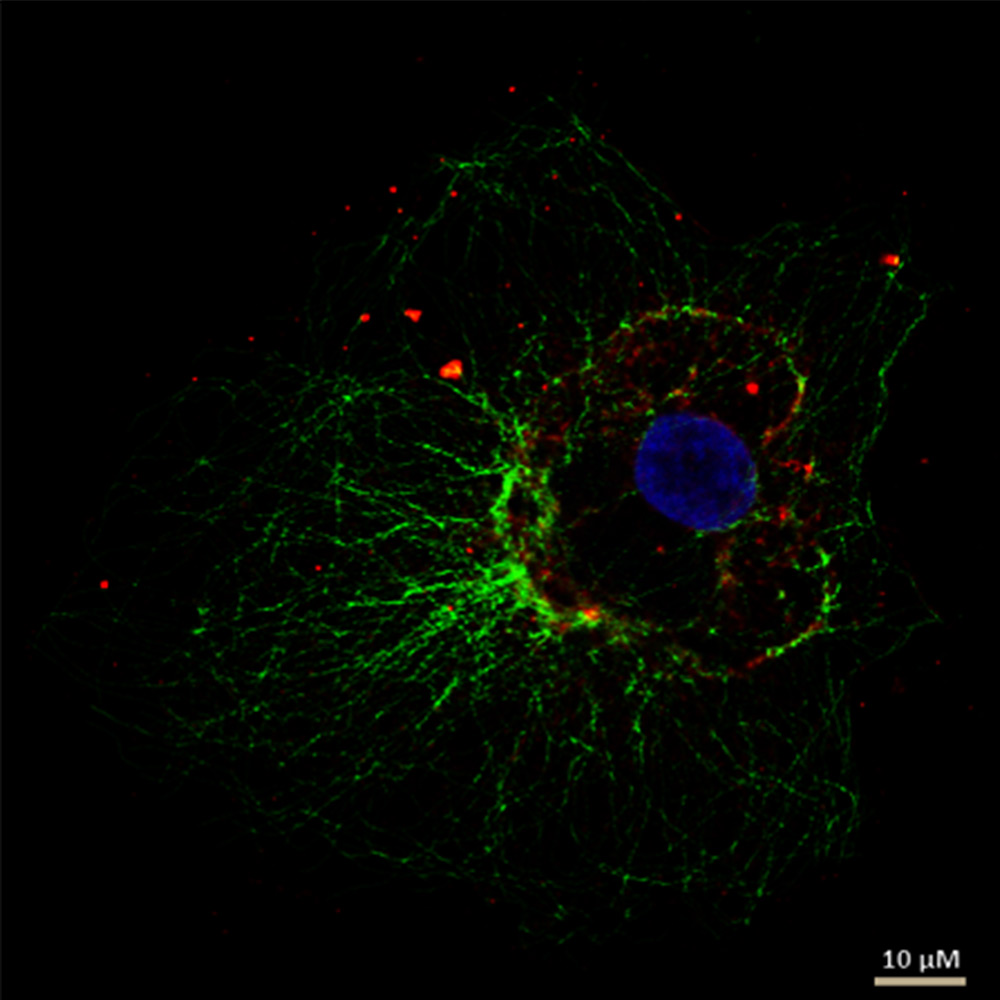
Figure 5: This figure demonstrates indirect IF staining of the mesocellular microtubule meshwork in fibroblasts (COS-7). Cell nuclei were stained using Hoechst 33342 and microscopically examined with a Leica confocal microscope.
Controls
Essential for IF are appropriate controls for the correct interpretation of your microscopy images. Missing or incorrect controls typically result in false positive statements and incorrect data. To begin with, you should analyze a sample that has only been fixed, permeabilized and blocked in order to get an idea of the autofluorescence of the cellular compartments. Sometimes structures appear highly fluorescent, even though there is no staining by IF.
As a further control and for adjusting the microscope parameters for indirect IF, a sample is used which has also been treated as described above, but which has additionally been incubated with the secondary antibody(ies). First, this would reveal a strong non-specific binding of the secondary antibody to the specimen. Second, the microscope parameters are set so that no signal is recorded during image acquisition of this control. This setting is used as a threshold for subsequent acquisitions to exclude false-positive signals by the secondary antibody. In direct IF the autofluorescence control serves for adjusting the threshold. Next, you analyze the samples which were incubated with the specific primary antibody and in the case of indirect IF also with the secondary antibody. Here a fluorescence signal should now be detectable which is above the autofluorescence and the negative control of the secondary antibody.
In order to be sure that the first antibody exclusively labels the desired structures, some manufacturers offer a blocking peptide for the first antibody that masks the specific antigen, thus preventing the antibody from binding to its epitope. This is more expensive but also the best way to determine the antibody’s specificity and therefore to get reliable results. In a multicolor IF experiment you must also pay attention to crosstalk between the selected fluorochromes. If performing a multicolor IF for the first time, it is advisable to additionally stain the target structures in separate preparations and to compare these images with the multicolor image. Ultimately, you should take a shrewd look at your acquired data and compare it with your expectations and existing data on the same primary antibody.
Limitations
As previously described, IF has many advantages, but it also entails some disadvantages. A key point is the fixation of the sample: Fixing means killing, so live cell imaging is no longer possible. The analysis of dynamic processes is therefore complicated, since for each time point cells must be fixed and stained. Thus, quick dynamic processes are not observable with IF. This is clearly an advantage of the expression of fusion proteins with fluorescent tags such as GFP, which are suitable for live cell imaging. As mentioned above, the IF procedure (fixing/permeabilization) alters the cellular architecture, so artifacts may be interpreted as false positive signals. It is therefore essential to prepare proper controls for each IF staining and this can be time-consuming. Another disadvantage is unavoidable: photobleaching of the fluorochromes. Fluorescent proteins like GFP are also affected by this, but when stored under proper conditions, GFP is detectable even after months in permanent preparations. In contrast, IF fluorochromes lose their intensity faster, which is reflected by rapid bleaching of the sample during microscopy. Even mounting media with anti-fading agents can only temporarily help here.

Standard IF protocol
This is a standard protocol for indirect IF of cultured cells on coverslips with fixation by chemical crosslinkers.
- A humidified chamber is perfect for the IF procedure and can easily be self-made (see Slideshow "How to prepare a humidified chamber"). It prevents drying of the preparation and allows incubation in the dark, which is important in handling fluorochromes and necessary for already existing fluorescent proteins.
- The volumes are chosen in a way that the coverslips are completely moistened. Make sure that the sample never fully runs dry.
- All incubation steps take place at room temperature.
- …
Recipes
Wash buffers
- 1 × PBS (phosphate buffer saline)
- 137 mM: NaCl
- 2.7 mM: KCl
- 10 mM: Na2HPO4
- 1.8 mM: KH2PO4
- Adjust the pH to 7.2–7.4 with HCl
- For PBS++ add a final concentration of 1 mM CaCl2 and MgCl2
- For PBS-T add a final concentration of 0.05 % Tween 20
Fixation buffers
- Formaldehyde:
- Dissolve 4 % PFA (Paraformaldehyde) in warm (50–70 °C) dH2O at pH 8 (adjust with NaOH).
- Add 10 × PBS to a final concentration of 1 × PBS (e.g. 100 mL 10 × PBS in 900 mL 4 % PFA/dH2O).
- Adjust pH to 7.2–7.4 with HCl.
- Methanol (prechilled to –20 °C):
- 100 % Methanol (–20 °C)
- Methanol/Acetone (prechilled to –20 °C):
- 50 % Methanol (–20 °C) and 50 % Acetone (–20 °C)
Permeabilization buffers
- TX-100 (Triton X-100):
- PBS with a final concentration of 0.1% TX-100
- Saponin:
- PBS with a final concentration of 0.1 % Saponin
- Other detergents may be applied in the same concentration in PBS.
Blocking buffers
- BSA (bovine serum albumin):
- PBS with a final concentration of 1 % BSA
- Milk powder:
- PBS with a final concentration of 1 % milk powder
- Normal serum:
- PBS with a final concentration of 5 % normal serum
Nucleic dyes
- Hoechst or DAPI:
- Prepare a solution of Hoechst 33342 or DAPI with a final working concentration of 1 µg/mL in PBS.
 and phalloidin (magenta), imaged using Viventis SCAPE; scale bar 50μm. Courtesy of Marina Cuenca and Heleen Jungen (Dayton lab), EMBL Barcelona.")