Old but vital
Together with new developments in microscopy technology and, more recently, with the aid of computing, metallography has been an invaluable tool for the advancement of science and industry over the last hundred years.
Some of the earliest correlations between microstructure and macroscopic properties established in metallography using light microscopes include:
- A general increase in yield strength and hardness with decreasing grain size
- Anisotropic mechanical properties with elongated grains and/or preferred grain orientations
- A general tendency of decreased ductility with increasing inclusion content
- A direct influence of inclusion content and distribution on fatigue crack growth rates (metals) and fracture toughness parameters (ceramics)
- The association of failure initiation sites with material discontinuities or microstructural features, such as second-phase particles
By examining and quantifying a material’s microstructure, its performance can be better understood. Thus, metallography is used in almost all stages during the lifetime of a component: from the initial materials development to inspection, production, manufacturing process control, and even failure analysis if needed. The principles of metallography help to ensure product reliability.
An established but intuitive method
Analysis of a material’s microstructure aids in determining if the material has been processed correctly, and is therefore normally a critical issue in many industries. The basic steps for proper metallographic examination include: sampling, specimen preparation (sectioning and cutting, mounting, planar grinding, rough and final polishing, etching), microscopic observation, digital imaging and documentation, and quantitative data extraction through stereological or image analysis methods.
The first step of metallographic analysis – sampling – is critical to the success of any subsequent study: the specimen to be analyzed has to be representative of the material being evaluated. The second, equally important, step is to correctly prepare a metallographic specimen, and here there is no unique way to achieve the desired results.
Metallography has been traditionally described as both a science and an art, and the reason for this statement lies in the fact that experience and intuition are equally important for exposing the true structure of the material without causing significant change or damage, in order to reveal and make measurable the features of interest.
Etching is probably the most variable step, so careful selection of the best etch composition and control of etchant temperature and etch time are mandatory to obtain confident and repeatable results. Very often a trial and error experimental method is required to find the optimal parameters for this step.
More than metals: Materialography
Metals and their alloys still play a prominent role in many forms of technological development, because they offer a broader range of properties than any other materials group. The number of standardized metallic materials extends to several thousand and is continuously increasing to meet new requirements.
However, as specifications have evolved, ceramics, polymers or natural materials have been added to cover a wider spectrum of applications, and metallography has expanded to incorporate new materials ranging from electronics to composites. The term "Metallography" is now being replaced by the more general "Materialography" to deal also with ceramics "Ceramography" or polymers "Plastography".
In contrast to metals, high-performance or engineered ceramics have higher hardness values, even though they are basically brittle in nature. Other outstanding properties are excellent high temperature performance and good resistance to wear, oxidation, or corrosion in aggressive environments. However, the full advantage that these materials can provide is strongly influenced by the chemical composition – impurities- and microstructure.
Similarly to metallographic preparation, sequential steps have to be carried out to prepare ceramic samples for microstructural investigation, but a careful selection of parameters is required at every step and must be optimized, not only for each type of ceramic, but also for the specific grade. Their inherent brittleness makes it advisable to replace conventional abrasives with diamond in every preparation step from sectioning to final polishing. Etching can be a challenge due to the chemical resistance of ceramics.
Beyond brightfield
Light microscopy has been used for many decades to provide insight into the microstructure of materials.
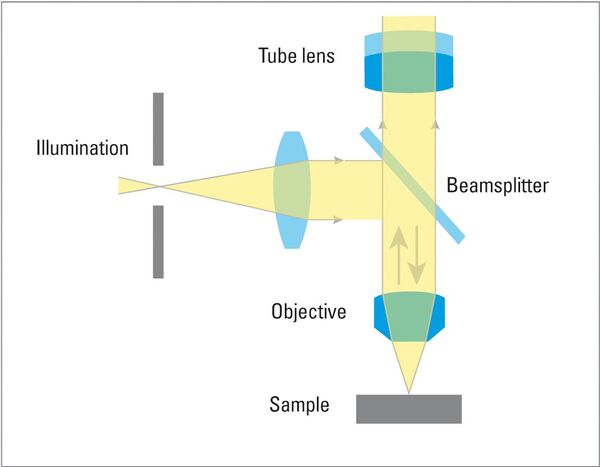
Brightfield (BF) illumination is the most common illumination technique for metallographic analysis. In incident BF, the light path comes from the light source, passes through the objective lens, is reflected off the surface of the specimen, returns through the objective, and finally reaches the eyepiece or camera for observation. Flat surfaces produce a bright background due to reflection of a large amount of the incident light into the objective lens, while non-flat features, such as cracks, pores, etched grain boundaries or features with distinct reflectivity, such as precipitate and second phase inclusions on the surface appear darker as incident light is scattered and reflected at a variety of angles or even partially absorbed.
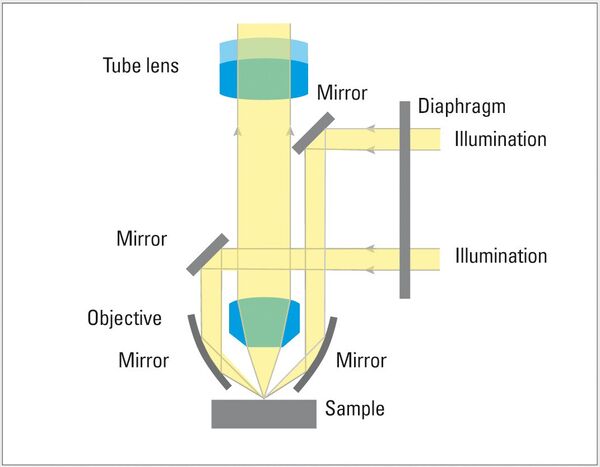
Darkfield (DF) is a less known but powerful illumination technique. The light path for DF illumination passes through an outer hollow ring of the objective, falls onto the specimen at a high angle of incidence, reflects off the surface, then passes through the interior of the objective lens, and finally reaches the eyepiece or camera. This type of illumination causes flat surfaces to appear dark, as the vast majority of the light reflected at the high incident angle misses the interior of the objective lens. For samples having a flat surface with occasional non-flat features – cracks, pores, etched grain boundaries, etc. – the DF image shows a dark background with brighter areas corresponding to the non-flat features, which scatter more light into the objective.
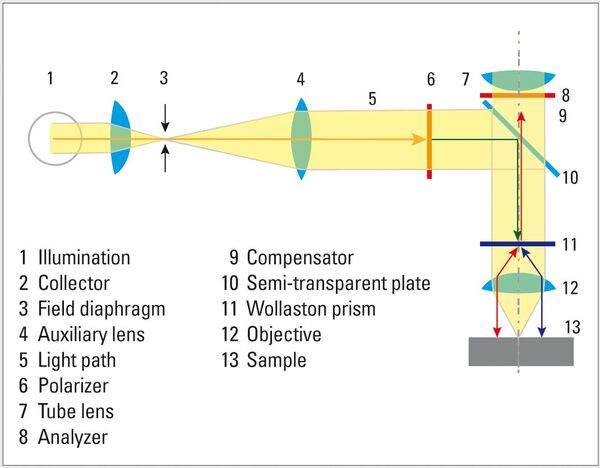
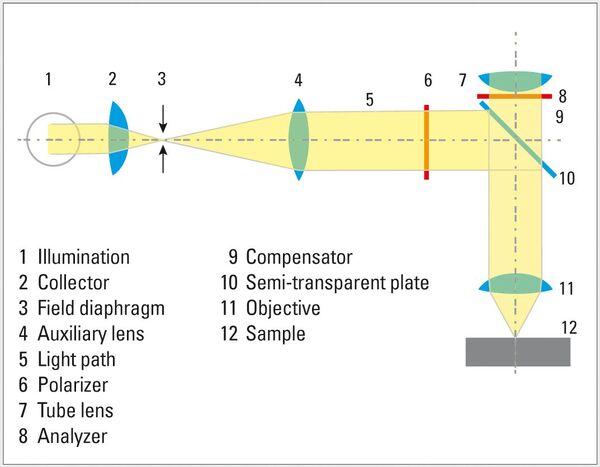
Differential Interference Contrast (DIC), also known as Nomarski Contrast, helps to visualize small height differences on the specimen surface, thus enhancing feature contrast. DIC uses a Wollaston prism together with a polarizer and analyzer whose transmission axes are perpendicular (crossed at 90°) to each other. The two light waves split by the prism are made to interfere after reflection from the specimen surface, rendering height differences visible as variations in color and texture.
For the majority of cases, incident light microscopy provides most of the required information, but for some cases, in particular polymers and composite materials, transmitted light microscopy (for transparent materials) and the use of stains or dyes can provide insights into the microstructure that would remain hidden when using standard bulk sample preparation and normal incident illumination.
Because many thermoset materials are inert to common metallographic etchants, the sample’s microstructure is often best observed with transmitted polarized light to enhance the differences in refractive index of discrete features.
Polarization: Natural light consists of light waves with any number of vibration directions. Polarization filters only let light waves through that vibrate parallel to the direction of transmission. Two polarizers crossed at 90° generate the maximum extinction (darkening). If the sample between the polarizers changes the vibration direction of the light, characteristic birefringence colors appear.
Life is colorful
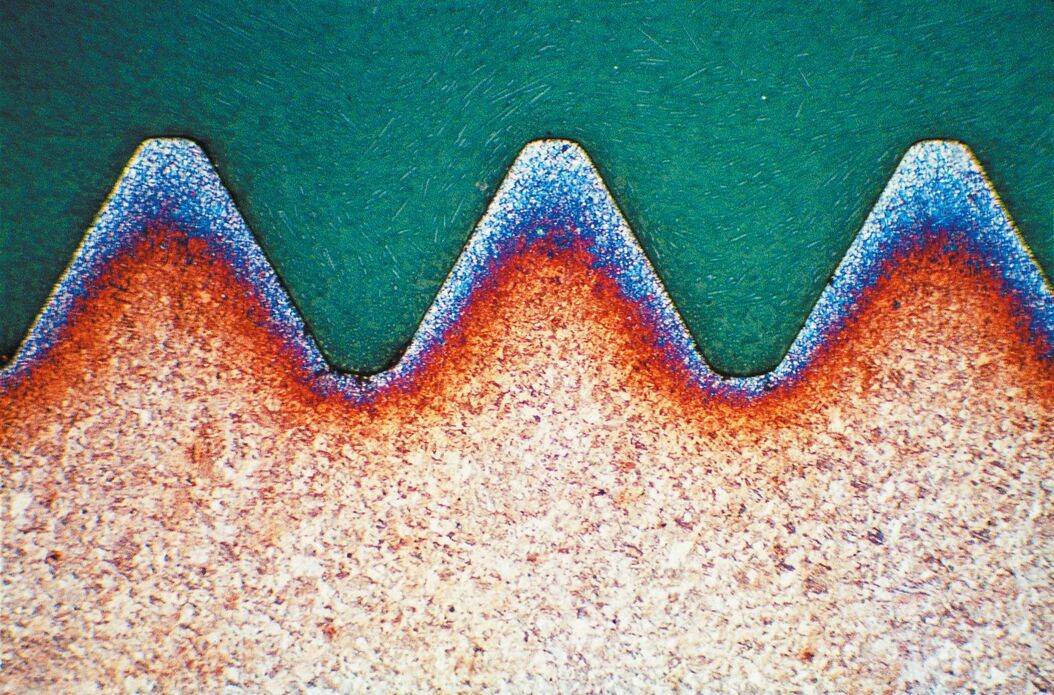
The natural color of microstructures is usually of very limited use in metallographic applications, but color can reveal useful information when exploiting certain optical methods, such as polarized light or DIC, or sample preparation methods, like color etching.
Polarized light microscopy is very useful for the examination of metals with a non-cubic crystallographic structure, such as Ti, Be, U and Zr. Unfortunately, the main commercial alloys (Fe, Cu, Al) are not sensitive to polarized light, so color or tint etching provides an extra method which can reveal and discriminate features in the microstructure.
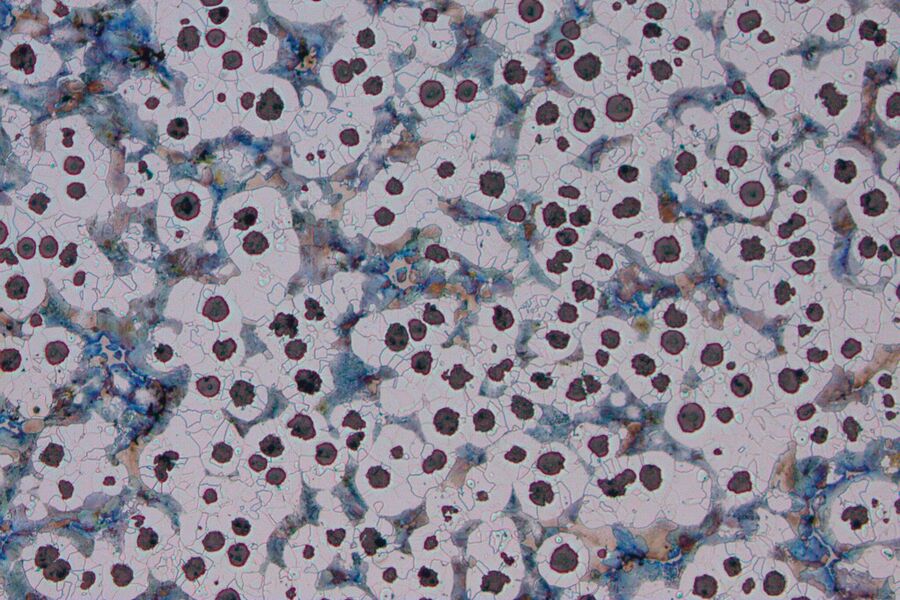
Color (tint) etchants are generally applied chemically (by immersion in solution) or electrochemically (immersed in solution with electrodes and applied potential), producing a thin film on the surface of the specimen which is usually feature-dependent. The thin film interacts with the incident light and generates color by interference which can be observed in normal brightfield illumination, but is significantly enhanced using polarized light and phase retardation (lambda [λ] or waveplates). Additionally, heat tinting or vapor deposition are alternative methods for creating interference films.
In steel alloys, the so-called "second phase" constituents can be selectively colored by etching, which provides a method to identify and quantify them separately. Discriminating ferrite and carbides in steel by color etching is a common procedure.
The growth of interference films can be a function of the crystal orientation of features, e.g., grains, on the sample surface. For alloys where etching with standard reagents (to attack grain boundaries) yields an incomplete network (of boundaries) and thus prevents digital image reconstruction, the color coding of the microstructure due to different grain orientations allows the analysis of grain size to be performed.
Quantitative is better than qualitative
The origin of quantitative metallography lies in the application of light microscopy to the study of metallic alloy microstructure. The first basic questions which material scientists had to address were:
- What are the sizes of certain features in the alloy and how many of these types of features are there?
- How much of a particular constituent is present in the alloy?
For many years, the use of chart ratings and visual comparison had been the only approach capable of answering these questions with semi-quantitative statements. Nowadays, modern motorized and computerized microscopes and image analysis systems provide a rapid and accurate means for automating most of the evaluation and assessment methods covered by international or industry standards.
Measurements are usually made over a series of two-dimensional images and can be classified into two main groups: those used to quantify the size, shape, and distribution of discrete particles (feature measurements) and those related to the matrix microstructure (field measurements).
A few examples of the first group would be the determination of the inclusion content of steel, classification of graphite in cast iron, and evaluation of the porosity in a thermal spray coating or sintered part.
Common applications of a field measurement are the determination of the average grain size by interception or planimetric methods and the estimation of the volume fraction of the microstructure constituents by phase analysis. Using image analysis software, multiple phases can be detected in a single field, quantified, and graphically represented.
Not only micro but also macro
Macroscopic examination techniques are frequently employed in routine quality control as well as in failure analysis or research studies. These techniques are generally a prelude to microscopic observation, but they are sometimes used alone as a criterion for acceptance or rejection.
The macroetch test is probably the most informative tool among this group and it is widely used for quality inspection in many stages of materials processing or forming. With the aid of stereo microscopes and a great variety of illumination modes, macroetching provides an overall view of the degree of uniformity of a component by revealing the lack of homogeneity in the microstructure of materials. Some examples are:
- Macrostructural patterns resulting from solidification or working (growth patterns, flow lines, banding, etc.)
- Weld penetration depth and heat-affected zones
- Physical discontinuities (porosity, cracking) due to solidification or working
- Chemical and electrochemical surface modifications (decarburization, oxidation, corrosion, contamination)
- Case hardening depth (surface hardening) in steel alloys or patterns due to quenching irregularities
- Damage caused by improper grinding or machining
- Thermal effects due to overheating or fatigue
Summary
Metallic alloys play a prominent role for many technologies and applications, due to their broad range of properties. There are several thousand standardized alloys available today and the number continues to grow as new demands can require new alloys.
Metallography is the study of alloy microstructure: microscale spatial distribution of phases, inclusions, and other constituents. A variety of techniques, most often microscopy, are used to reveal the alloy microstructure.
The microstructure of alloys have a significant effect on many of their important macroscopic properties, such as tensile strength, elongation, and thermal or electrical conductivity. A thorough understanding of the relationship between microstructure and alloy properties is the fundamental reason for the field of metallography. The knowledge from metallography is utilized for metallurgy (alloy design and development) and alloy production.
However, at the same time a much greater variety of ceramics and polymers have been developed which are also used for many different applications. The basic principles of metallography can be applied to the characterization of any material. As a result, the more general term "materialography" is starting to replace metallography.

