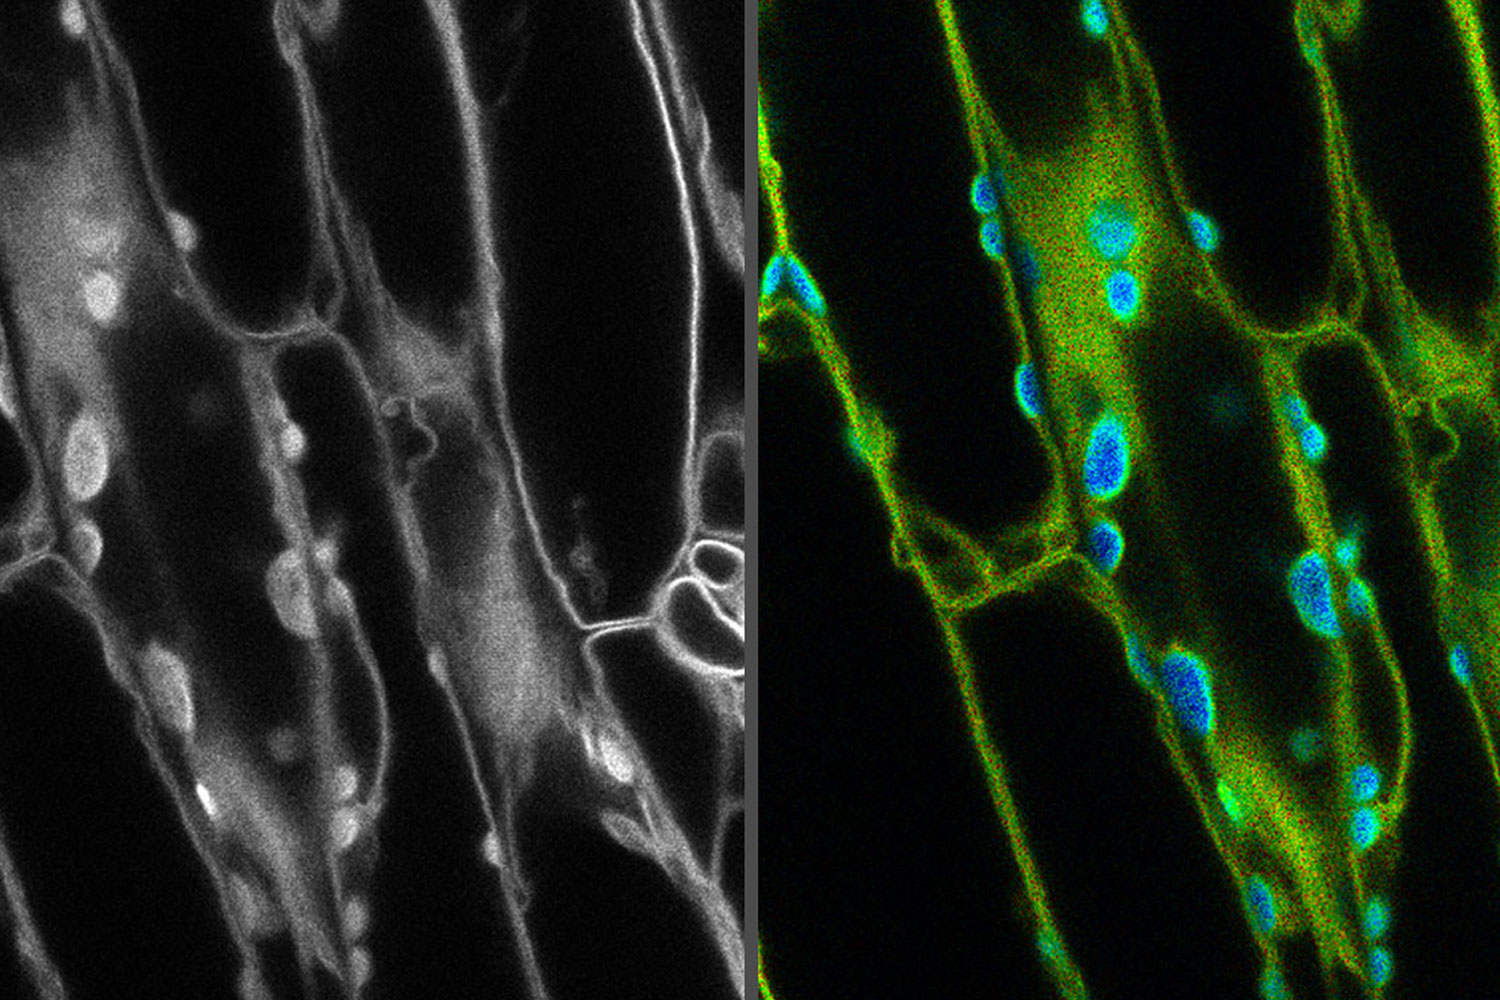
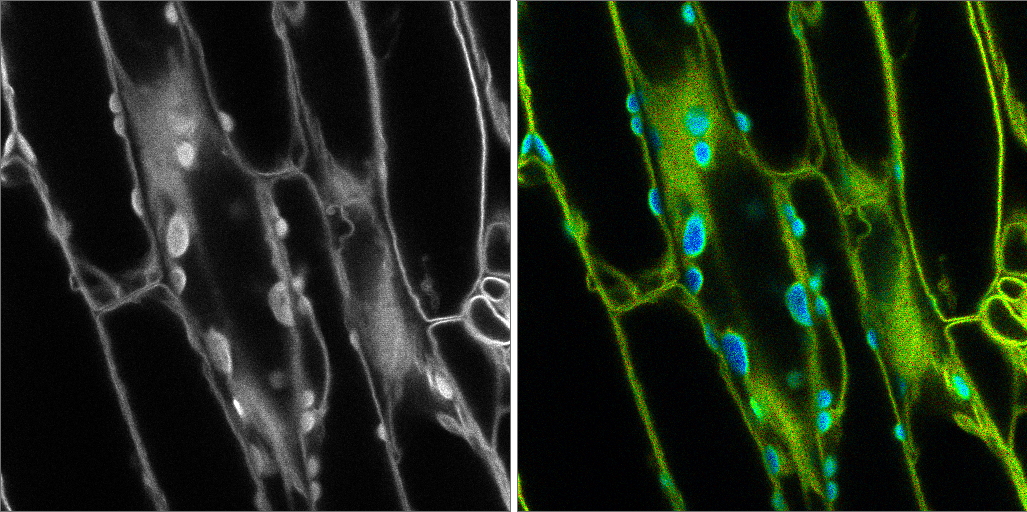
 from the desired fluorescent signal from the cell membrane (green).")
Introduction
Fluorescence microscopy has revolutionized our understanding of biology. The ability to locate specific molecular events within cells with high spatial resolution has given insight into everything from gene expression pathways to drug interactions.
As the technology in modern confocal microscopes has improved, the sensitivity has also increased. As with any sensitive measurement, a fundamental problem is the signal to noise ratio, where background noise can obscure small changes in the signal.
In fluorescence confocal microscopy, one of the biggest sources of noise is autofluorescence. Removing this background is essential to be able to understand the small differences in signals that are present within a sample. In this review, we will explore how to remove autofluorescence with some quick fixes and some modern techniques such as fluorescence lifetime imaging which are becoming easier to use with the help of advances in software and microscopy hardware.
Causes of autofluorescence
Autofluorescence has many potential causes and there can be often multiple sources within a single sample. For starters, cell preparations themselves can be a source of endogenous autofluorescence. Some common sources are NADH, flavins, lipofuscins, collagen and elastin, as well as chlorophyll and lignin in plant samples. In other words, they are hard to get rid of.
As well as the cells adding to the autofluorescence, the way that the samples are treated prior to imaging can introduce additional background fluorescence. This can be anything from drug treatments to mounting media. It is important to locate the source of the autofluorescence before attempting to remove it.
Ways to remove autofluorescence
Know your sample
If you experience problems with autofluorescence, the first thing to do is to try and isolate the cause by investigating your sample. When you start your experiments, run an unlabeled control to determine whether there is any contribution to background fluorescence from the staining procedure.
It’s also important to know the spectra of your autofluorescence. This can be determined using spectral lambda scanning. Spectral scanning will help with experiment optimization and avoiding strong peaks in autofluorescence.
Optimize the fluorophore
Once you have a good idea of the spectra of your autofluorescence, the next stage is to optimize your fluorophore choices. If the spectra of the autofluorescence and your fluorophore overlap very closely then there is a high chance that your signal will be masked by the autofluorescence. In this case, select a fluorophore with spectra far away from your background autofluorescence. For example, if your autofluorescence is in the blue region of the spectrum, move your fluorophore to the green or red.
When selecting fluorophores, choose a modern probe such as Alexa Fluor, Dylight, or Atto. These dyes tend to be brighter, more stable, and have narrower excitation and emission bands, making it easier to select only the signal from your fluorophore. If your microscope can detect them, far red dyes are a very good way to avoid problems with autofluorescence, since these wavelengths are seldom found in biological samples. Being able to detect far red dyes has the added bene fit of being able to expand the number of channels that can be used for multicolor experiments.
With a fluorophore selected, it is important to not blindly run your experiment with the concentrations listed on the tube. More often than not, a titration of the fluor phore will be necessary, testing different concentrations on your sample. This a lows you to see which concentrations give you the best differentiation from your background and the lowest autofluorescence. Use the manufacturer’s instructions as a guide and create a dilution series of the fluorophore to cover a range slightly below and slightly above the recommended usage. Test these dilutions against your sample to work out which will give you the most useful signal.
Optimize your microscope settings
The settings on your confocal microscope play a huge role in which signals are visible in your image, including autofluorescence. Use these settings to your advantage to cut out as much of the autofluorescence signal as possible by adapting the spectral detection. There are different ways to do this depending on the microscope, but the most flexible option is to choose a white light laser coupled with a spectral detector. This means that you can precisely tune the wavelengths of light reaching your sample as well as the wavelengths passing through the detector. This allows for very fine control when selecting which signals are recorded in the captured image, and gives ample opportunity to eliminate autofluorescence.

Treating your sample to avoid autofluorescence
Autofluorescence frequently comes not from the sample, but from the way it is treated prior to imaging. For example, mounting media, tissue culture media and laboratory plastic can all be sources of autofluorescence.
If you are running live-cell imaging experiments, then consider replacing your normal culture medium with pre-warmed phenol red-free medium or a clear buffered saline solution prior to imaging. In addition to the pH indicator phenol red, which is highly fluorescent when excited at 440 nm, culture media and supplements like FBS can contain many proteins and small molecules with fluorescent signals of their own—all of which can add up to a strong autofluorescence background if they are not removed. If you do decide to switch your cells to a new type of medium for live imaging, it’s important to be aware that this could cause unexpected changes in cell behavior and phenotype, so depending on what you are studying you may need to adapt the cells to the new medium first.
It’s also worth measuring autofluorescence from the imaging dishes that you are using with the same microscopy setup to see if this is a source of autofluorescence. If it is, try imaging using culture dishes with glass windows or glass-bottomed dishes that are specially designed to remove
autofluorescence signals.
Similar problems can also be seen when imaging biopsies and tissue samples that have been exposed to chemicals. A common example is the digestive tract, which can have large amounts of autofluorescence if it was exposed to antibiotics such as tetracycline that have a strong fluorescent signature. In this case, fluorescence can easily be removed by thorough rinsing with buffered saline or the careful use of solvents.
If you are fixing cells, the fixation method can have a big impact the autofluorescence. Consider alternatives to formalin and glutaraldehyde, and try not to store fixed samples for too long before imaging, because autofluorescence can increase over time.
Software
While omitting autofluorescence through experimental design is optimal, som times it is just not possible. In these cases, there can be computational solutions to your autofluorescence problems. Using your microscopy software or open source solutions such as ImageJ, it is possible to analyze the pixels containing the aut fluorescence and try to subtract this from the overall image [1]. Beware, though, that computational approaches can be complex. There are many different methods and algorithms to choose from, so it’s a good idea to try a few to see which work well. It’s important to remember that these methods can often reduce the strength of your fluorophore signal as well as autofluorescence, so use them carefully and be aware that there is often a tradeoff between increasing contrast with the bac ground and reducing your signal intensity.
Removing autofluorescence after fixation
Once you have your samples prepared and stored in the freezer, it can seem like any autofluorescence is there to stay. While it is easier to eliminate autofluorescence in the sample preparation stages, there are certainly steps that can be taken even at later stages in the process.
There are many chemical treatments that can attenuate autofluorescence signals. Some of these are commercially available, while others can be easily prepared using common lab chemicals such a sodium borohydride, Sudan black B, ammonium ethanol etc. [2,3].
Photobleaching tends to have negative connotations in microscopy, being associated with losing your fluorescent signal after spending a long time hunting for the best image with the laser turned up slightly too high. However, for autofluorescence, bleaching can be your friend. Before adding your fluorophores, you can treat your sample with high intensity LED light to bleach all of the background autofluorescence. Afterwards, your chosen fluorophore should contrast much more strongly against the bleached background [4].
Advanced methods for removing autofluorescence
Microscopy and fluorophore technologies are continually advancing with autofluorescence in mind. There are two innovations that are becoming more readily available in commercial confocal microscopes.
White light lasers
White light lasers (WLL) give a lot of flexibility when it comes to reducing autofluorescence. Firstly, they enable you to finely tune your excitation wavelengths to match your chosen fluorophores while complementing the autofluorescence profile of your sample.
White light lasers also give you maximum flexibility when it comes to fluorophore selection, since theoretically they can give you the capability of working with all known fluorescent dyes across the spectrum. With wavelengths from 440 nm to all the way into the far-red end (790nm), the capability of exciting modern far red fluorophores is particularly advantageous when dealing with autofluorescence, which is more commonly found in the blue and green bands of the spectrum.
Last, but not least, fiber-based WLL technologies enable pulsed excitation, so that you can record fluorescent signal (count photons) in the very short interval between pulses. This is an essential requirement for time-correlated single photon counting (TCSPC)—the gold standard approach for fluorescence lifetime analysis. With WLL capability on board, FLIM can be built into your microscope setup, providing a very effective and relatively straightforward way to reduce autofluorescence and improve image contrast.
Lifetime imaging
Fluorescence lifetime imaging methods can be useful for eliminating autofluorescence. Instead of relying only on the fluorescence intensity at a given wavelength, lifetime measurements reflect the amount of time the fluorophore spends in the excited state, which is usually on the order of nanoseconds. This is useful because the chances of your background autofluorescence and your fluorophore having overlapping spectra are relatively high. However, the chances of them having the same lifetime signal are much smaller. This means that lifetime measurements can be used to differentiate autofluorescence from your fluorophore signal, even if they appear to be in the same spectral range. The ability to differentiate fluorescence signals in this way means that using lifetime measurements it is possible to collect meaningful information from almost any fluorescent signal, even autofluorescence. While lifetime measurements have traditionally been a relatively complex technique, improvement in both hardware and software are making it easier to incorporate into any confocal microscopy workflow.
Summary and conclusions
Autofluorescence doesn’t have to ruin your experiment.
When you only have a finite number of precious samples, it is vital that nothing compromises the quality of your experimental data. Autofluorescence is a common occurrence that can ruin your experiment if you let it.However, there are many solutions to autofluorescence from simply switching out the media that you use in your samples all the way up to the use of technologically advanced microscopes and detectors.
Being prepared for autofluorescence is the best way to stop it affecting your experiments. By being prepared you can make choices in experimental design that will reduce or completely eliminate background fluorescence.
Download
Download Review Article "How to Reduce Background Autofluorescence and Improve Confocal Microscopy Images" (pdf)
 and phalloidin (magenta), imaged using Viventis SCAPE; scale bar 50μm. Courtesy of Marina Cuenca and Heleen Jungen (Dayton lab), EMBL Barcelona.")
 and acceptor (A) molecule which participate in FRET (Förster resonance energy transfer).")