
Causes of unsatisfactory image quality
Unsatisfactory image quality can have various causes. If you can rule out wrong microscope settings such as inhomogeneous illumination or an incorrect diaphragm setting, the next step is to check the specimen. If the specimen is OK, inspect the specimen slide and the coverslip and clean if necessary. If you still cannot find the reason for the loss of quality, and are using the right immersion oil, the problem might be due to dirt in the microscope itself.
Components accessible to the user
Some components such as filter cubes and the interior optics of the microscope should only be cleaned by specialists of the manufacturer and not touched by the user. Other impurity-prone components may be cleaned carefully by the user, such as:
- Objective front lenses
- Glass protecting the camera sensor and possibly also the surface of the sensor itself
- Condenser lens
- Eyepiece lenses
- All other freely accessible glass surfaces


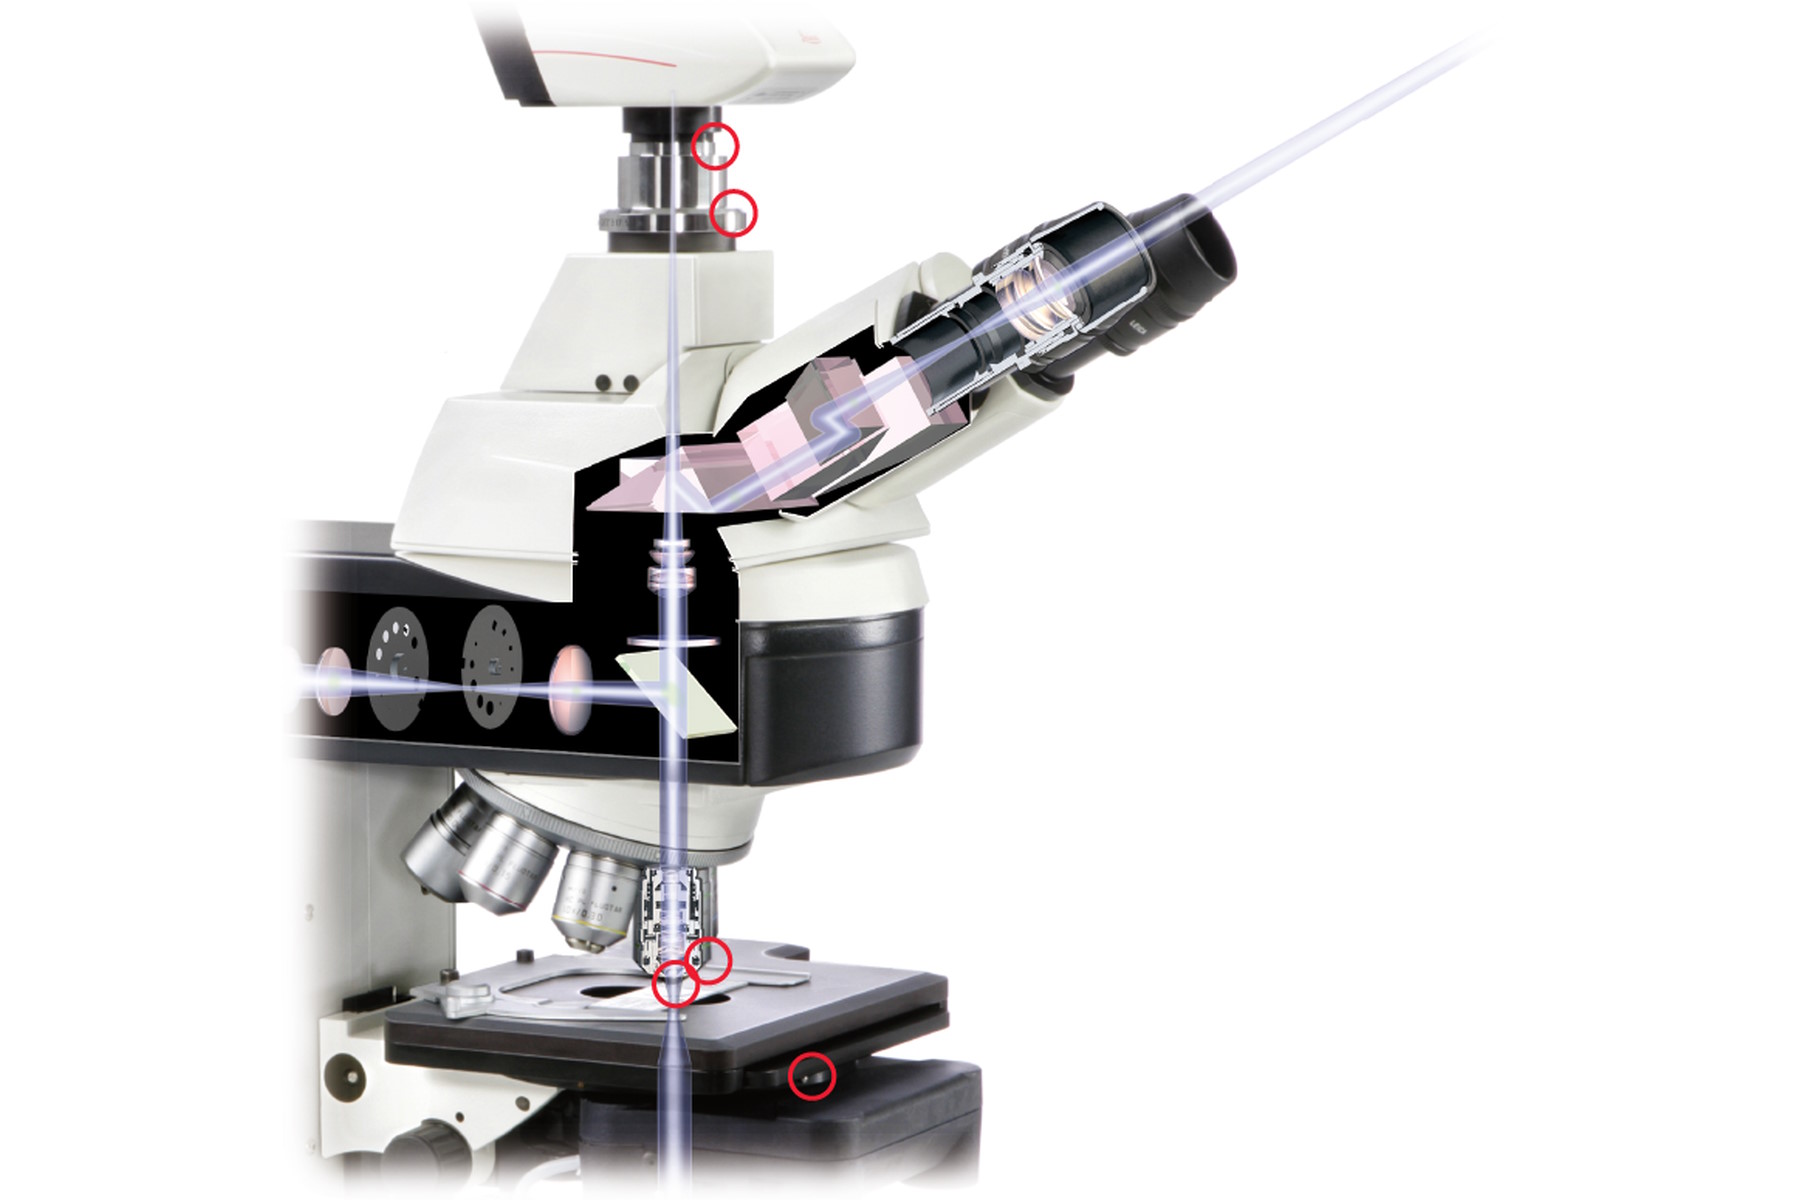
Locating the impurity
First you should try to find the exact location of the impurity. Dirt on the camera is easily recognized by the fact that the position of the dirt in the image does not change when the camera is rotated or moved. However, if its position does change, the dirt is somewhere else. The objectives can also be checked by slight rotation. To inspect the other parts of the microscope it is a good idea to have an exact look at them. If possible, for instance in the case of the eyepieces, we recommend holding the lenses in front of a bright, homogeneous background and looking through them. It can generally be assumed that the impurity is located on a component if it follows the movement of the component.
Removing the impurity
There are various types of impurity. Loose or non-permanent dirt may consist of dust, skin flakes or glass splinters from broken slides or coverslips, for instance. Stubborn dirt can basically be divided into water-soluble and solvent-soluble categories. In practice, however, it is often a mixture of the two.
The aim of cleaning the microscope is naturally to restore perfect image quality. All foreign matter should be removed from the optical components – without damaging them, of course. The question is, which is the best way to get rid of the particular type of impurity? The general procedure is always the same. First, the dirt must be located and carefully inspected. In the event of major contamination, loose dirt should be removed first, then water-soluble dirt and finally the dirt that can only be removed with solvents.
Remove loose dirt with compressed air, solid dirt with cleaning liquids
As long as there is only loose dirt on the microscope optics, it is advisable to remove it with compressed air. This method is particularly gentle and prevents damage to the optics. Small bellows are often sufficient to generate the required stream of air.
When removing stubborn dirt, never use abrasive materials such as paper or microfiber cloths, as they can damage the lens surfaces and lead to scratches. Apart from this, stubborn dirt should never be removed dry. Another important point to remember is that only pure solvents, distilled water and clean tools may be used. Always apply cleaning liquids with certified cotton swabs or pads used for medical purposes to make sure they are clean enough and do not contain any foreign objects. Solvents containing ammonium should also be avoided. These can attack the anti-reflection coatings of the microscope optics and cause permanent damage. Acetone should not be used for cleaning either, as it may attack plastic components in the microscope.
There is an extremely simple and gentle way of removing water-soluble dirt which is worth trying first. Blow on the impurity so that the water vapor in your breath is used for cleaning. Then remove the dirt by rubbing absorbent cotton in a circular movement from the middle of the dirt outwards. This is the most effective way of removing the dirt without distributing it unnecessarily over the lens.

Avoid impurities in the first place, if possible
This is best done by putting the dust hood over the microscope after use. Apart from this, immersion oil residue should be carefully removed from immersion objectives. If you remember all the above-mentioned points and clean the optics properly and carefully, there is nothing left to prevent you from obtaining the image quality you require.