
3D tissue imaging
Tissue sections from model organisms or patients are used to analyze tissue morphology down to cellular morphology. This can reveal differences between healthy and non-healthy individuals or between control and treatment. For example, the presence or absence of certain cells or their morphology (e.g., shape, volume, length, area) are parameters which are informative.
Fluorescence microscopy helps to identify specifically labeled cells or cell components. Therefore, either transgenic organisms or immunofluorescence staining are used. In addition, the occurrence of certain genes and transcripts can be visualized by Fluorescence in Situ Hybridization (FISH).
One example for 3D tissue imaging is the imaging of neurons in the brain to determine their length, volume, or connection to other cells. For example, the brain slices could be derived from model organisms suffering from ischemia and the goal would be to understand morphology differences and cell counts.
Challenges
One of the first challenges is to get a first glimpse of the sample with a microscope. The sample needs to be placed on the stage and often moved around in 3D so it can be properly imaged. What you see through the eyepieces or on the screen is only a very small section of the total sample volume. Therefore, it can be cumbersome to keep the sample in good focus and find the right position, so that something of interest becomes visible. Mica’s Sample Finder automates the process by bringing the sample in focus and generating a low magnification overview of each relevant area that can then be used for orientation throughout the complete imaging workflow.
The next challenge is to set up the imaging parameters, so that the sample is not unnecessarily photobleached, but the signals of interest are visible. This step typically involves choosing settings for technical parameters, both excitation and detection, as each may have different effects on the sample and results obtained. With Mica, a simple click on “Live” triggers the automatic setup of all parameters necessary to visualize fluorescence. The automatic setup, which is used to optimize the parameters for the current view, can be triggered at will with a single click on “OneTouch” at any time. Before changing certain technical parameters of a microscope, normally the effects of doing so need to be known and considered by the experimenter, however, with Mica the setup is output driven, i.e., the required output is defined, and the required adaptations are done automatically.
The first step of a typical workflow is locating the right position to be imaged. Using eyepieces, one has to maintain a mental map of the sample and individual positions have to be remembered. Using a digital microscope to generate an overview of the sample may help, but one still has to point to a position in the image which is intended for further imaging. Mica offers a way to make this simple using the Navigator tool. Overviews of the sample at lower or higher magnification help users locate interesting positions. These regions of interest on the sample can be directly marked by drawing on the image with the tool. That way the context of the subsequent high-resolution imaging can be kept.
High magnification objectives often require the usage of immersion media. The most common ones are water and oil. Water offers the best optical index match for imaging samples in aqueous solution and oil for imaging embedded samples. However, water immersion objectives can also be used for fixed samples with little compromise on the quality of imaging. Mica can be equipped to meet both application demands. However, the water immersion objective has the additional benefit of being operated in a completely automated way. The immersion is established and maintained automatically. To further increase the optical quality, some objectives, feature a CORRring to compensate for the thickness of the sample carrier. The CORRring can require either manual or motorized operation. Due to the SmartCORR feature, optimization is automatically done with Mica.
Another challenge of imaging tissue sections is their relative thickness. Thick sections can leads to a noticeable amount of straylight which interferes with the wanted signal. THUNDER offers the opportunity to reduce background blur and, thus, is a valuable computational imaging methods for tissue imaging. Mica has THUNDER integrated into the system and can help identify in a reasonable time interesting areas.
Besides computational clearing methods like THUNDER, optical sectioning like Confocal Laser Scanning Microscopy (CLSM) is another way for 3D tissue slide imaging. In this case, availability and usability can be challenging.
Based on their sophisticated technical set up, confocal microscopes commonly require extended training times. However, Mica – which combines confocal and widefield imaging in one system – reduces the number of imaging parameters to be set up to a minimum, reducing the necessary training time and presupposed microscopy skills.
Furthermore, it uses the same look and feel for image setup of both the confocal and widefield imaging modes. Thus, users don’t have to learn two different systems. And users can swap between widefield and confocal whenever and wherever needed without having to transfer the sample from one system to another.
One key aspect of scientific experiments is to change as few variables as possible to pinpoint any effects on the sample and results. Besides keeping the sample treatment the same, another aspect are the same imaging parameters for excitation and detection. Mica by default keeps the imaging parameters constant within projects and only changes them at the will of users. Imaging parameters can easily be restored from reference images.
Methods
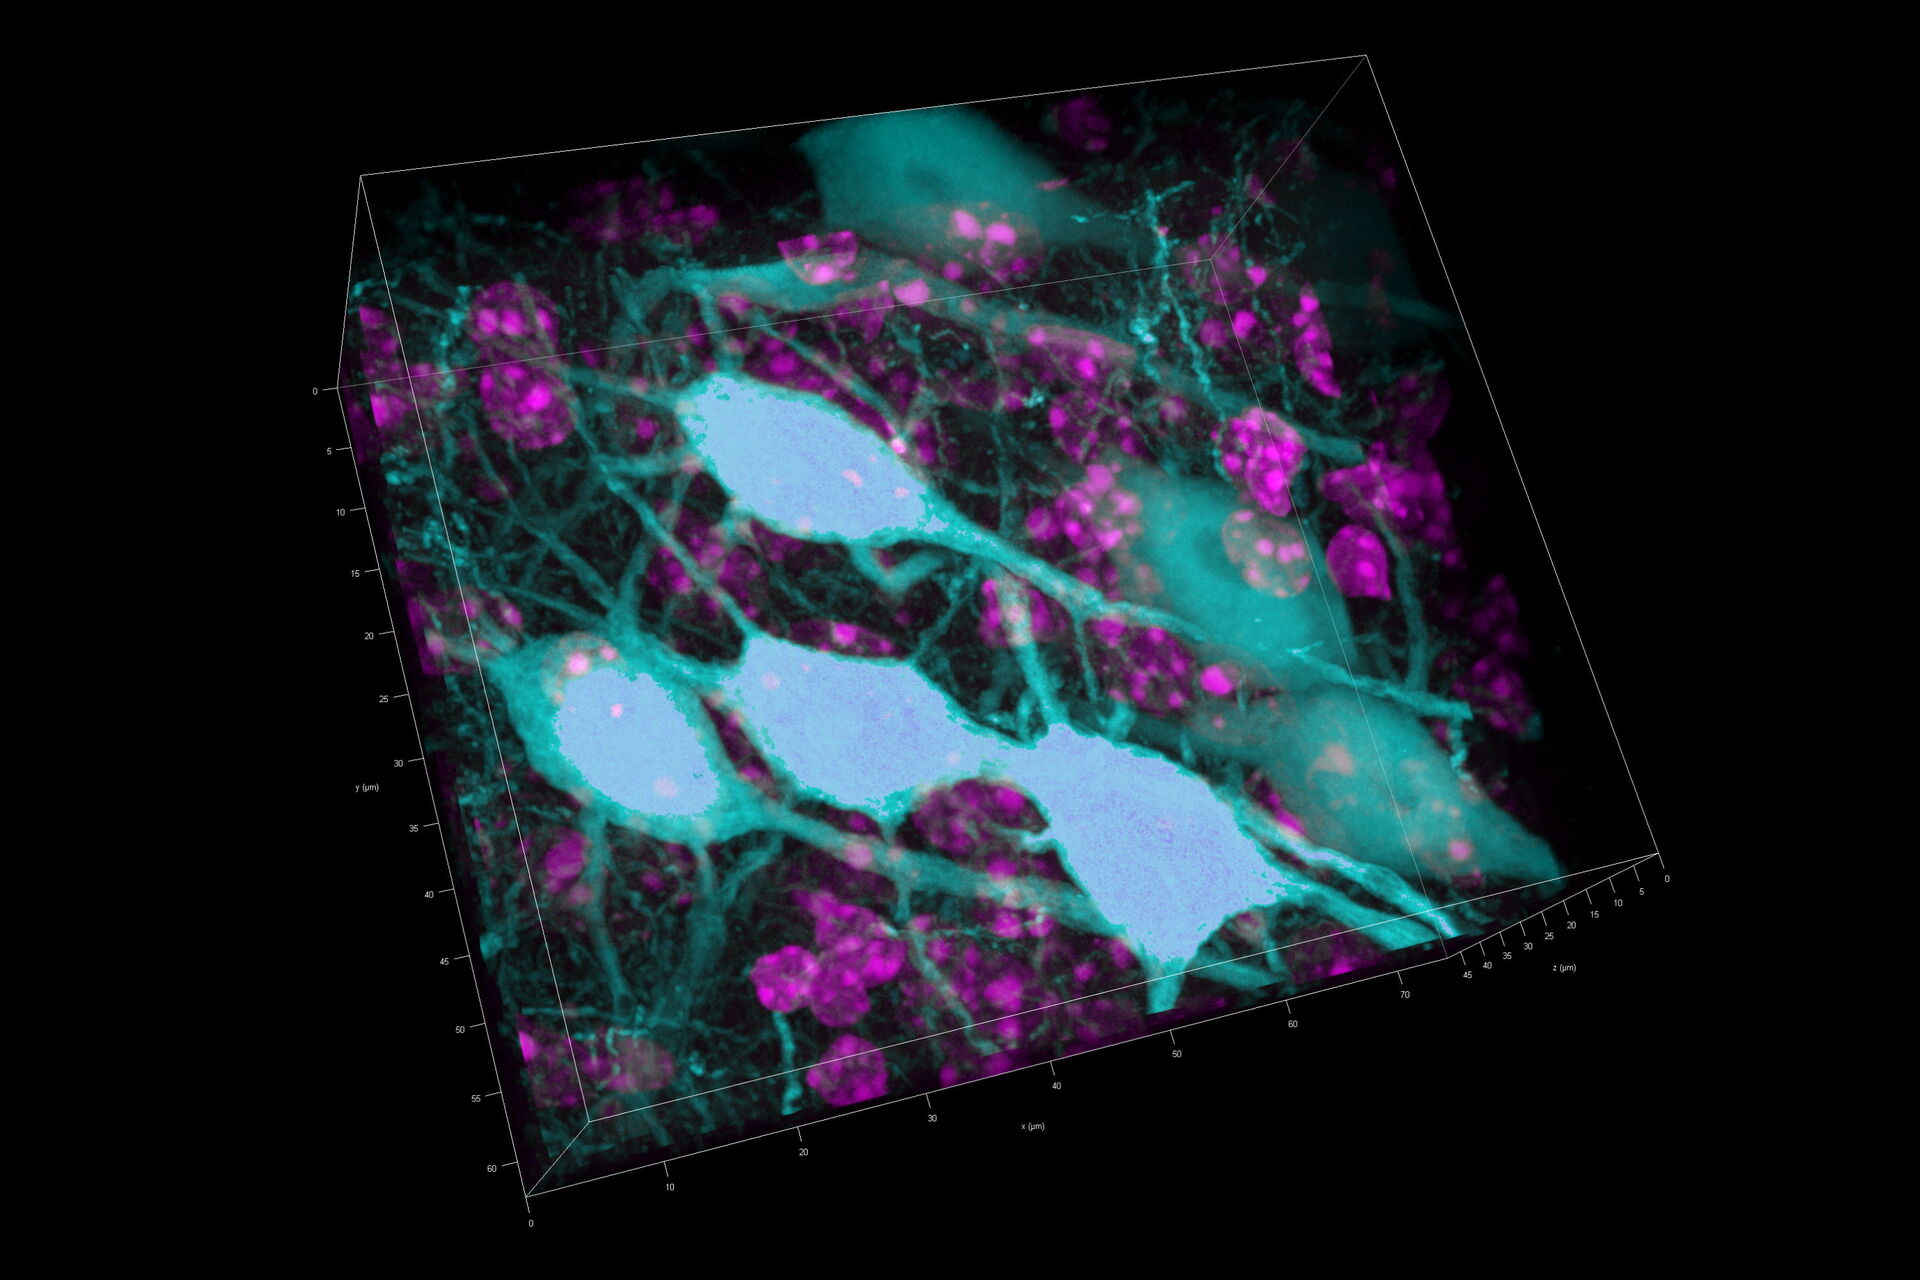
Three rat brain tissue sections with a thickness of 250 µm contain the following fluorescent markers:
- Nuclei (DAPI, magenta)
- Neurons (cytoplasmic GFP, cyan)
- Astrocytes (GFAP-DsRed, red)
The slide was fit in the slide holder (Figure 1) and placed on the stage for imaging.

Basic information, such as coverslip type and staining of the sample, were entered in the Sample Definition. With this information, the Sample Finder could identify the coverslip and took a low magnification overview automatically. This overview of the whole coverslip could be used to identify the three tissue sections which were marked with the Navigator’s Magic Wand tool afterwards. Without having to tweak the imaging parameters manually, a tile-scan of the marked area was then imaged in widefield mode at 20x magnification. At this magnification and resolution, it was possible to identify interesting areas on the tissue section which should be imaged by confocal microscopy afterwards. For this, Mica was switched to confocal mode at the relevant region where high-resolution images, including 3D volumes, were recorded. For the 3D volume definition, the z-interface was utilized. Within the s-interface the limits can be set either manually or automatically with just a mouse click. The z-Range Finder identifies the beginning and end of the volume automatically.
After the imaging, dendritic spines were measured with the help of the Mica Learn & Results tool. For this, the Pixel Classifier was used to identify the spines using a Maximum Projection. The Pixel classifier is a simple to use, yet powerful tool, as it requires users label only examples of objects, spines in this case, with the drawing tools which are similar to commonly used painting tools. The model is trained to best reproduce the input and then provides a preview of the remaining objects in the image. Once trained, the model is used to analyze the images.
Results
The single brain sections were identified on the slide overview and marked with the Magic Wand tool for tile-scanning. The Magic Wand automatically recognizes the limits of the tissue section and defines the required tiles accordingly (Figure 2).

Mica’s simultaneous acquisition of up to four fluorophores saves users time compared to sequential imaging of filter-cube-based microscopy systems. On one tile-scan, an interesting area was identified to be imaged at higher magnification in confocal to reveal further details.
With more detailed information at hand, 2D images should be completed with 3D data. For this, a 3D volume was defined with the z-interface.
After volumetric (120 µm thick) acquisition in CLSM, the data was visualized in the 3D-Viewer to get additional spatial information of the brain sample.

For quantification, a Maximum Projection was generated from the 3D acquisition to measure the average area of the dendritic spines in the sample. The Pixel Classifier identified spines and the Analysis tool determined their area. Values can be plotted to visualize the data and correlations. Figure 4 shows a histogram of the sizes of dendritic spines. The results can also be displayed in a box plot for example to compare different dendritic spine populations (Figure 4).

Conclusions
Mica is a useful tool for 3D tissue imaging: With the Sample Finder function, users quickly get access to their sample to get a first impression of the overall quality and then define actions on how to further proceed. Afterwards, the Navigator view helps to dig deeper into the tissue section. Tools, such as the Magic Wand for faster ROI definition, plus the option to image up to 4 channels simultaneously, speed up tile-scanning processes. 3-D acquisition is simplified with a new z-interface and subsequent analysis is supported by the Pixel Classifier.
In summary, Mica combines widefield and confocal imaging in one system. It enables users to run an entire workflow – from overview to detailed 3D imaging plus analysis – in one system.


