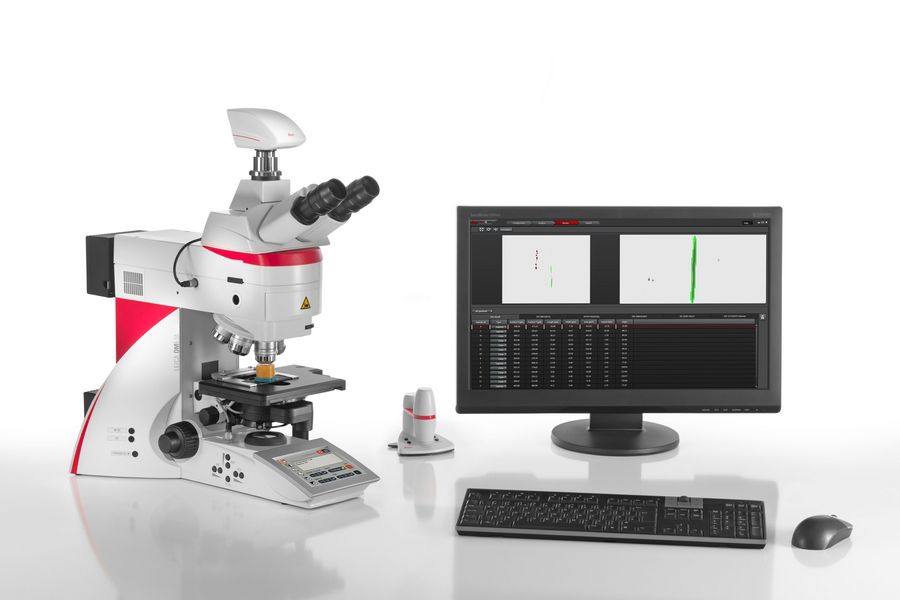
With a measurement microscope, users can measure the size and dimensions of sample features in both 2D and 3D, something crucial for inspection, QC, failure analysis, and R&D. However, choosing the right microscope involves assessing application needs along with microscope performance, ease of use, and flexibility. Today, measurements are often made digitally, i.e., a microscope with a camera and software and images displayed on a monitor, rather than via an eyepiece reticule, leading to increased precision and repeatability. Analyze samples reliably and quickly with the right measurement microscope.
Why use a measurement microscope?
Measurement microscopes are essential tools for analyzing the dimensions of features concerning a wide range of samples. They play a crucial role in inspection, quality control (QC), failure analysis, and research and development (R&D) in a variety of industries. Selecting the right measurement microscope depends on the specific needs of users and other factors, including sample types analyzed, applications done, optical performance, and camera resolution.
In the modern era, a measurement microscope has digital capabilities with a camera, monitor for image display, and software allowing users to measure and analyze samples precisely and in an automated way.
More information about how to choose the most appropriate measurement microscope are described below.
How to select a measurement microscope
Sample type, size, and features of interest
Before selecting a measurement microscope, users should understand which types of samples should be imaged and the features or structures that need to be analyzed. The microscope required can depend on whether sample surface features or internal structures are measured. Additionally, for the measurement of internal structures, sample preparation becomes critical.
Surface features can have a significant height above the surface, often being 3 dimensional, so a microscope with a large depth of field and good resolution is advantageous. Sample preparation is normally not required.
For internal structure analysis, typically samples are opaque, so a cross section must be prepared. The cross-section preparation involves cutting, grinding, and polishing [1]. Examples can be found for electronics, e.g., printed circuit boards (PCBs) and assemblies (PCBAs) and integrated circuits (ICs) (refer to figure 1). As the internal structure can be small, a microscope with higher resolution is commonly needed.
Applications
Measurement microscopes are needed for a range of applications. The more common ones are inspection, quality control (QC), failure analysis, and research and development (R&D).
Inspection and QC require precise and reliable measurements to verify product dimensions, identify defects, and ensure consistency during manufacturing. A microscope with the ability to go rapidly from seeing an overview of sample regions to visualizing fine details precisely and reliably is essential.
Failure analysis involves investigating component or material integrity and the cause of failures. A microscope can be used for analyzing cracks, wear, or defects at the macroscopic or microscopic scale.
R&D tends to concern investigations of poorly understood, complex sample features or structures often at the microscale during the development of new materials and components or even production processes. The microscope used for measuring should be highly accurate, reliable, and flexible.
Performance
The performance of a measurement microscope determines how clearly it can resolve fine details and accurately measure sample features or structures. Key factors for optimal performance include optical and digital resolution and correction of optical aberrations and flatness or planarity.
Resolution
Resolution refers to the microscope's ability to distinguish fine details, such as the separation between two closely spaced small points or thin lines. It is a critical factor for precise measurement tasks. The resolution of a measurement microscope depends on the numerical aperture (NA) of the optics, the lighting and contrast method used, and the digital camera pixel size (see just below) [2,3]. A larger NA correlates with better resolution. Typically, higher magnification objective lenses have greater NA values. Resolution is also affected by the light wavelength, but normally white light with an average wavelength of 550 nm is used.
Camera Pixel Size
For digital microscopy imaging, the camera's pixel size is important for resolution [2]. Most digital microscope cameras have pixels sizes in the 1 to 5 µm range. At higher magnification values, i.e., more than 2x, the microscope system resolution is determined by the numerical aperture and light wavelength. At lower magnification values, i.e., less than 2x, the numerical aperture is typically a small value and the resolution limit of camera sensors will start to be inferior to the optical resolution (numerical aperture and light wavelength). At low magnification, the camera sensor will likely determine the microscope system resolution. Smaller pixels allow for higher digital resolution of an image on an electronic display, especially at lower magnification values.
Optical Quality and Aberrations
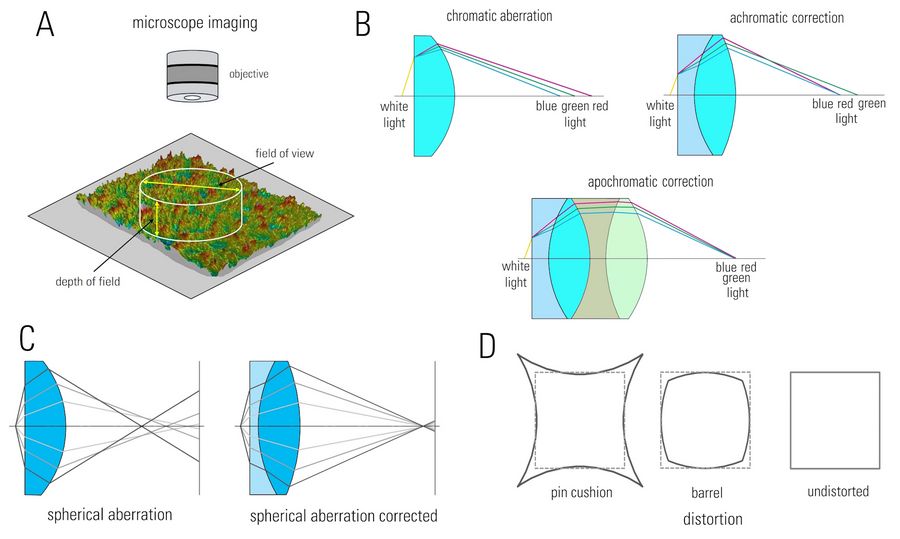
The microscope optics must be corrected for chromatic or spherical aberrations and planarity (refer to figure 2 below) which can affect measurement accuracy [4]. These aberrations can cause serious distortion of the image and planarity ensures that the image remains flat across the field of view. Both aberration correction and planarity are important for accurate measurements. Among the Leica standards for correction of microscope objectives there are achromats and apochromats [5]. Achromats have an achromatic correction where both the red and blue wavelength of light (within white light) have an absolute value of focus of less than 2 times the depth of field (DOF) [6] of the objective. Apochromats have an apochromatic correction where the red, green, and blue wavelength of light have an absolute value of focus of less than 1 times the DOF. The planarity (also called field flatness) for the field of view (FOV) of achromats and apochromats is up to 25 mm. Figure 2A below shows the DOF and FOV of an objective and figure 2B the correction for chromatic aberration.
Choosing the right kind of microscope
Stereo, compound, or digital microscope
Measurement microscopes use either fixed optics [7] (compound) or zoom optics [8] (stereo) [refer to figure 3]. While conventional stereo or compound microscopes have eyepieces, digital microscopes [9] do not, so the image is detected by an integrated camera and displayed on a monitor. Digital microscopes can use either fixed or zoom optics. Stereo microscopes and digital microscopes with zoom optics offer larger fields of view of the sample, but lower resolution. Compound microscopes and digital microscopes with fixed optics offer higher resolution, but smaller fields of view. Today, the vast majority of users take advantage of digital imaging and software for measurement and analysis of samples. A range of stereo, compound, and digital microscopes, as well as digital microscope cameras and software, available from Leica Microsystems perform well as measurement microscopes.
Important factors to consider
To determine the appropriate type of microscope to be used for measurement, there are some factors that have to be considered beforehand:
- Sample type, size, and form (solid, liquid, etc.) which will be measured and analyzed and any special considerations, e.g., electrical or environmental conditions (temperature, humidity), needed for imaging;
- Applications for which measurements are needed;
- Sample feature sizes that must be resolved for measurements;
- Special illumination and contrast [10-13] that are needed to clearly see features;
- Microscope setup and software that makes measuring practical, especially if many measurements are required.
For many sample types and applications, whether inspection, QC, failure analysis, or R&D, the ease of use, versatility, and flexibility of the microscope are critical. A user-friendly setup with customizable interfaces reduces complexity, minimizing measurement errors and reducing time to learn the software. Measurement microscopes that are easy to use, versatile, and flexible enhance user comfort and efficiency while measuring, resulting in the attainment of accurate and reliable data.
The performance of the microscope in terms of resolution, illumination, and sample positioning are also important. The resolution, illumination, and contrast should allow the sample feature size of interest to be easily resolved and clearly visualized. Positioning of the sample for measurements can require a stage with high-precision horizontal and vertical (x, y, and z) adjustments to ensure accurate and reliable measurements of features and structures.
Microscope calibration is essential for reliable and precise measurements [14]. Calibration should be done with a reference or standard initially after microscope setup and then checked on a regular basis. It is important for acquisition of reliable data and compliance with standards.
Examples of measurement microscopes
For accurate, reliable, and efficient inspection, QC, failure analysis, and R&D in various industries and scientific fields, Leica measurement microscope solutions are available for the cases below.
Basic 2D measurements
When only basic 2D measurements, e.g., dimensions of sample features and structures, distances between features or structures, angles between intersecting structures, or areas of various geometrical shapes, are required, then a Leica microscope using the Enersight software is an optimal solution (refer to figure 4). It can be operated even without the need of a computer.
Automated measurements
In some case, automated measurements are the most practical approach, so a Leica microscope with an automated optics, stage, and column setup using the LAS X software is the answer (refer to figure 6).
The automated microscope solution streamlines sample measurement and analysis, minimizing user intervention and effort and reducing errors, while enhancing reproducibility of results and workflow efficiency. It is particularly beneficial for industrial and research applications that require high-throughput repetitive analysis of complex samples, for example, metal alloy microstructure analysis of grains, phases, and inclusions.


