
Microscope calibration ensures accurate and consistent measurements for inspection, quality control (QC), failure analysis, and research and development (R&D). Calibration steps are described in this article. Using a reference, calibration enables reproducible results and helps ensure agreement with guidelines and standards. To attain accurate and consistent results, it is recommended to calibrate a microscope and regularly check it. If needed, support can be obtained from calibration experts.
Why microscope calibration is important
Accuracy and reliability
Calibration refers to the process of adjusting and verifying the accuracy of an instrument's measurements, for example an optical microscope, by comparing them to a known measurement standard or reference. It is important because accuracy determines how close the instrument's measurement is to the true or accepted value.
Proper calibration ensures that a microscope provides accurate and reliable results within a specified tolerance. Calibration can also improve precision by reducing or minimizing system errors. As optical microscopes can be used to measure micrometer-scale distances and resolve fine details, calibration is very important for obtaining accurate measurements and should be done regularly.
What influences accurate and reliable results
Several factors can introduce errors or inconsistency in microscope measurements, e.g., incorrect use of the microscope, frequent usage by multiple users for different applications, improper setup, variation of environmental conditions in the work area or laboratory, etc.
To make sure results stay consistent and reliable over time for all microscope users, in addition to calibration at regular intervals, the following actions should be taken:
- Minimize or eliminate microscope system errors, in terms of configuration or setup, which may be due to changes by multiple users or for different applications
- Maintain a stable environment, in terms of temperature, humidity, etc., where the microscope is used
- Correcting for unwanted or unexpected changes during usage, like misalignments, drift, etc.
- Operating the microscope within its specified limits and according to chosen guidelines and standards.
Fulfilling guidelines and standards
Microscope calibration can also help ensure that international, regional, and organizational guidelines or standards for specific applications are met. In fact, certain guidelines or standards, such as ISO, EN, ASTM, DIN, etc., can require certification that instruments used for an application are calibrated.
How to calibrate a microscope
Different types of optical microscopes
Optical microscopes are available with zoom optics, e.g., stereo microscopes [1], or fixed optics, e.g., compound microscopes [2] (refer to figure 1). There are also digital microscopes without eyepieces and an integrated microscope camera [3]. Conventional microscopes have eyepieces, but usually also the option to install a digital camera. A range of high-quality stereo, compound, and digital microscopes, as well as digital microscope cameras are available from Leica Microsystems.
 M205 C stereo microscope with zoom optics; B) Visoria M materials compound microscope with fixed optics; and C) DVM6 digital microscope.")
Accurate and reliable measurements with any of these microscopes require calibration which can be done for each type using a similar procedure. Today, measurements are most often made using a digital microscope camera, so calibration is done via the camera’s live image displayed on a monitor.
Step-by-Step Calibration Guide
As mentioned above, at present measurements with a microscope are often done with a digital image on a monitor. Ensure the camera is working properly before calibrating the microscope. In general, calibration can be done with the software by following steps like these below:
Step 1: In the microscope software, locate and open the calibration settings. Use the highest pixel resolution available with the microscope camera and check that there is no binning of the pixels.
Step 2: Add a calibration file if none are already there or create a new one.
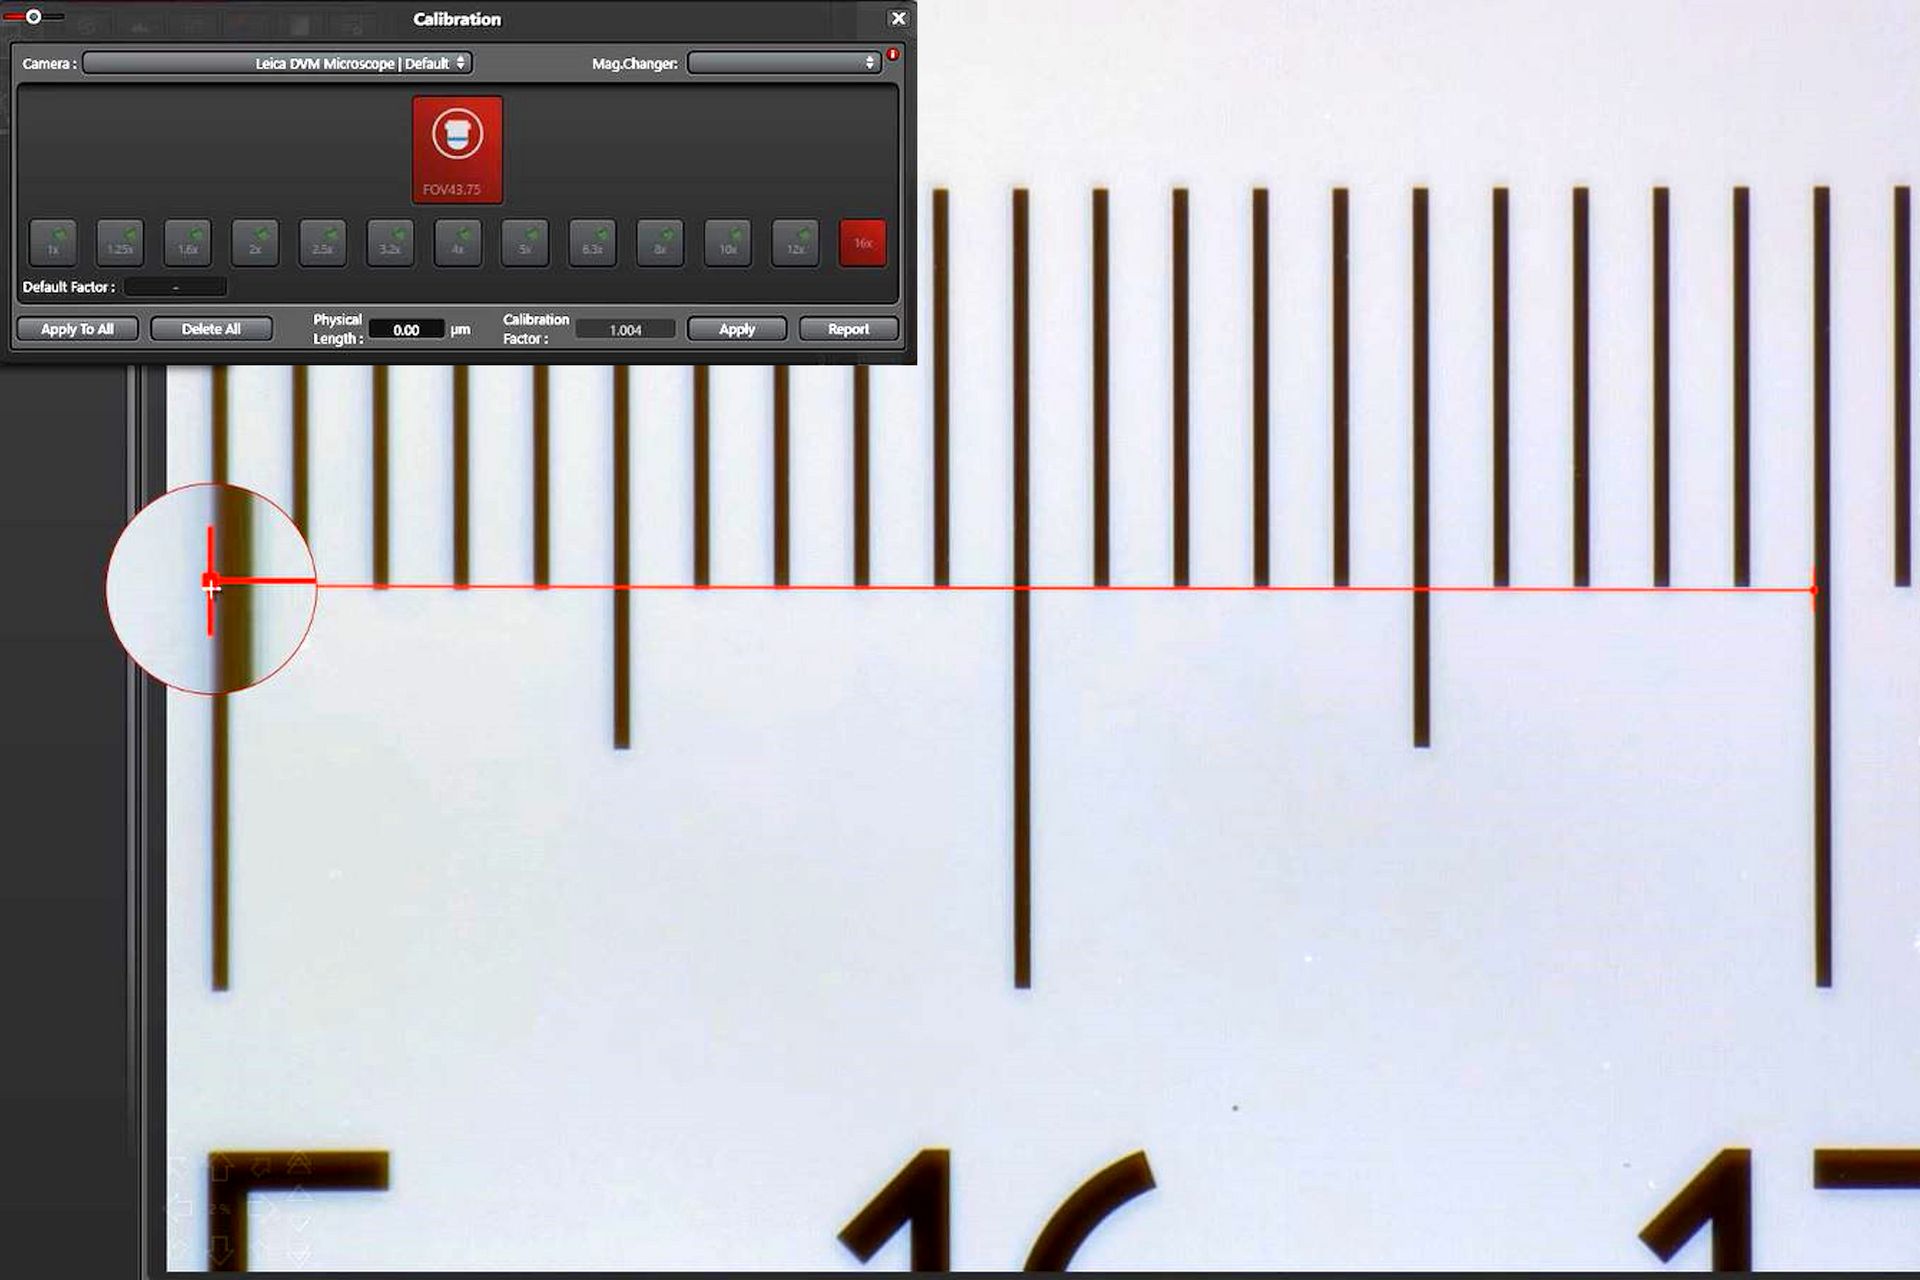
Step 3: Place an appropriate measurement reference, like a stage micrometer or ruler with a precise scale for lengths, on the microscope stage and bring it into sharp focus at a specific magnification value (refer to figure 2).

Step 4: Next, adjust the distance line that appears in the live image to match the corresponding marks on the reference which corresponds to the desired length and then indicate the length being measured in the software calibration settings (refer to figure 3).

Step 5: Now, change the magnification to the appropriate higher values, depending on if you have a microscope with zoom or fixed optics, and repeat step 4 for each magnification (refer to figure 4).
For accurate calibration at higher magnification values, it is important to verify that the distance line starts and ends on the same side or edge of the stage micrometer mark, e.g., from the left (or right) edge to the left (or right) edge (refer to fig. 4C and the video above).

Step 6: Finally, confirm the calibration, so the software saves the data. A calibration report can be completed for documentation (refer to figure 5).

Important point: Afterwards, it is recommended to check that the calibration has been done properly by making a precise distance measurement directly on the measurement reference.
Useful microscope accessories for calibration
These recommended accessories can help when performing microscope calibration:
- Lint-free tissues and solutions for cleaning the optics, like the objective lens, to ensure a clear live image of the reference
- Precise horizontal movement of the reference on the stage with a micrometer screw position system
- Microscope stage with fine focus.
Professional calibration service
A periodic calibration service from Leica Microsystems and its partners allows users to trace the accuracy of microscope measurements to known standards over long periods of time. To demonstrate accuracy, reliability, and readiness of use, microscope measurement results are compared to a stage micrometer or calibrated test slide. For certain users, taking advantage of this service can save them time and be cost-effective. For some industries and fields, a certified calibration service is mandatory for the instruments used. The frequency of calibration often depends on the industry or application, but it is normally done just after installation, repairs, and upgrades, and repeated once each year.


. With DIC users are able to visualize small height differences on the wafer surface more easily.")
