
Array tomography
Array tomography (AT) is a high resolution, 3D image reconstruction method for cellular structure analysis. It is performed using scanning electron microscopy (SEM) or light microscopy (LM) imaging of ordered arrays of ultrathin, resin-embedded serial sections. AT allows quantitative, volumetric structural analysis and visualization of cellular structures. It has better lateral and spatial resolution than conventional confocal microscopy. In addition, a higher throughput can be achieved by partially automated examination of bio-specimens.
Related articles
High Resolution Array Tomography with Automated Serial Sectioning

Automatic Alignment of Sample and Knife for High Sectioning Quality

High Quality Sectioning in Ultramicrotomy

Principle of ultrathin sectioning
For TEM observations, as well as for optimal 3D reconstructions with array tomography, ultrathin, ordered sections are a pre-requisite. An ultramicrotome, like the UC Enuity from Leica Microsystems, can produce such ultrathin sample sections (20 to 150 nm thick).
To form an image of a specimen in the transmission electron microscope, electrons have to penetrate the sample without any major loss in speed. A sample’s permeability to electron radiation depends partly on its mass and thickness (thickness × density) and partly on the acceleration voltage of the electron microscope. The electrons absorbed by the specimen can cause a build-up of heat and, thus, the formation of artifacts in the object.
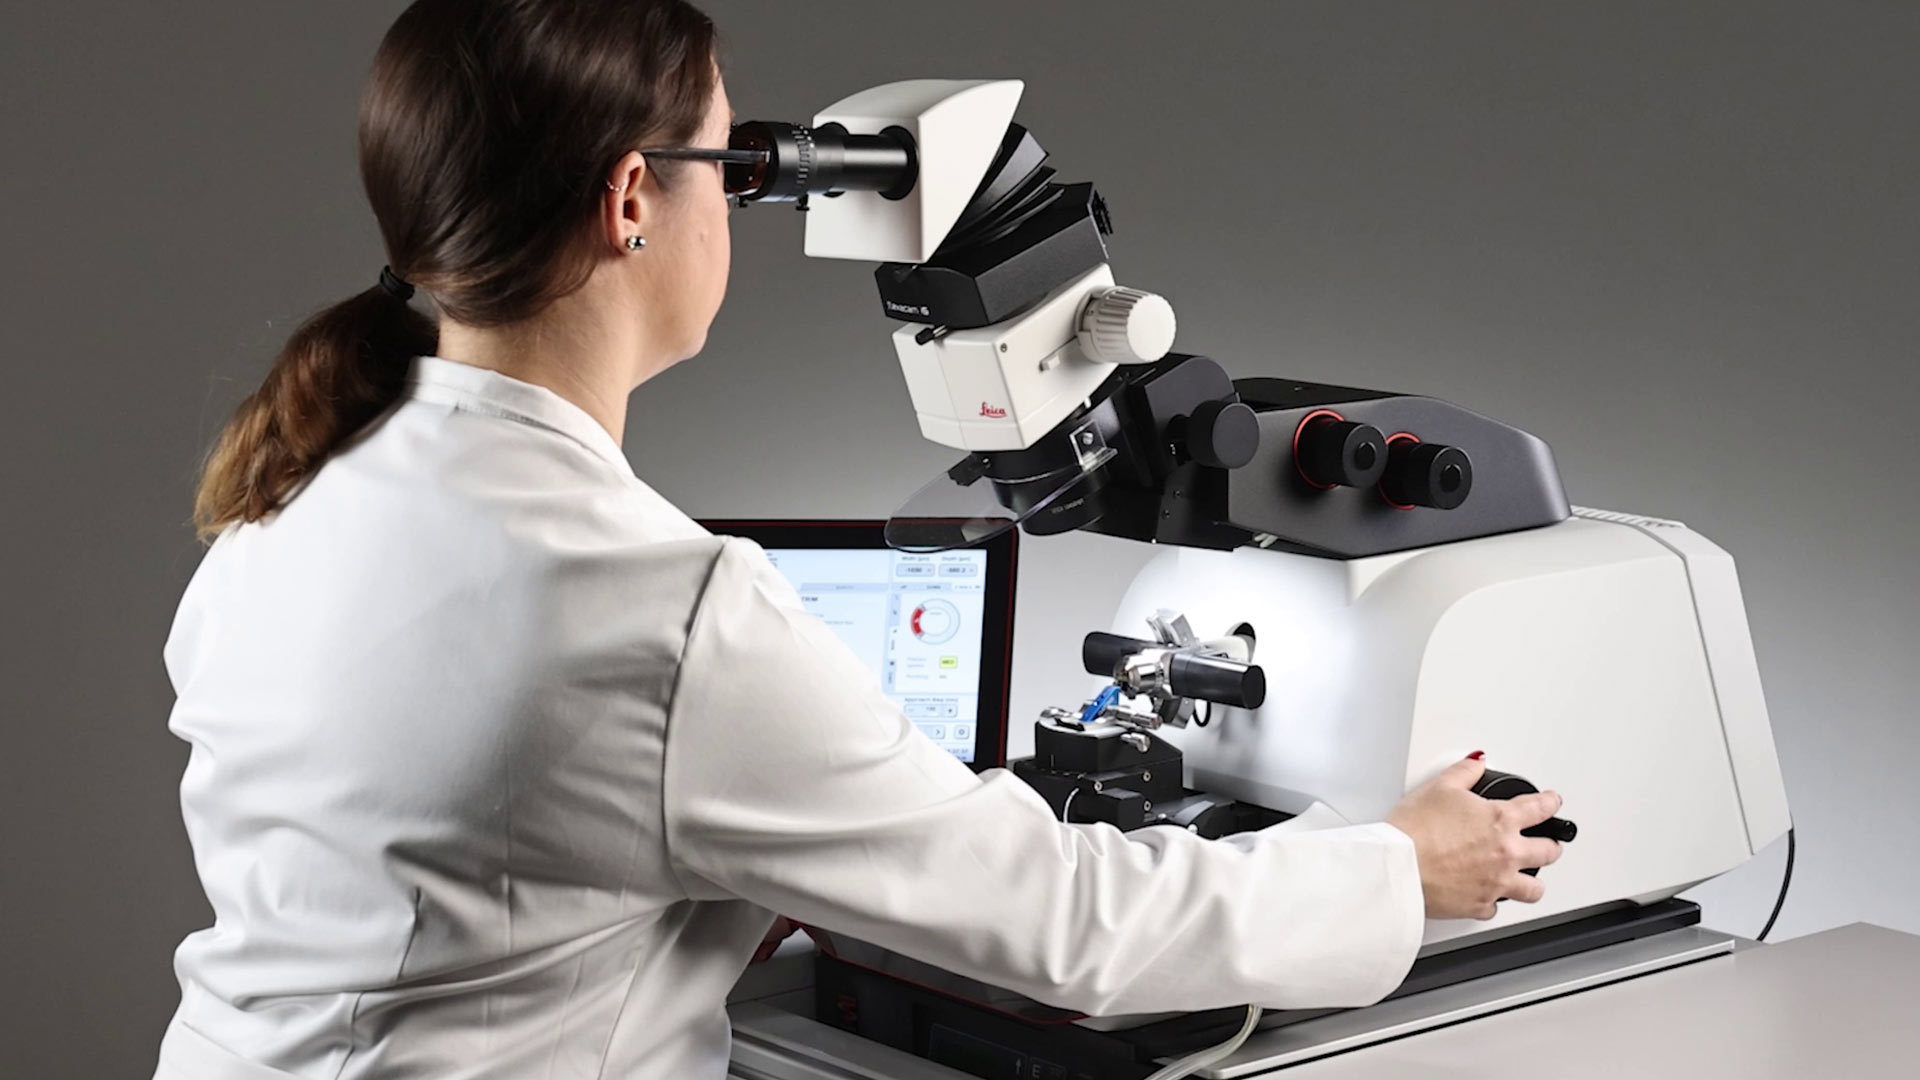
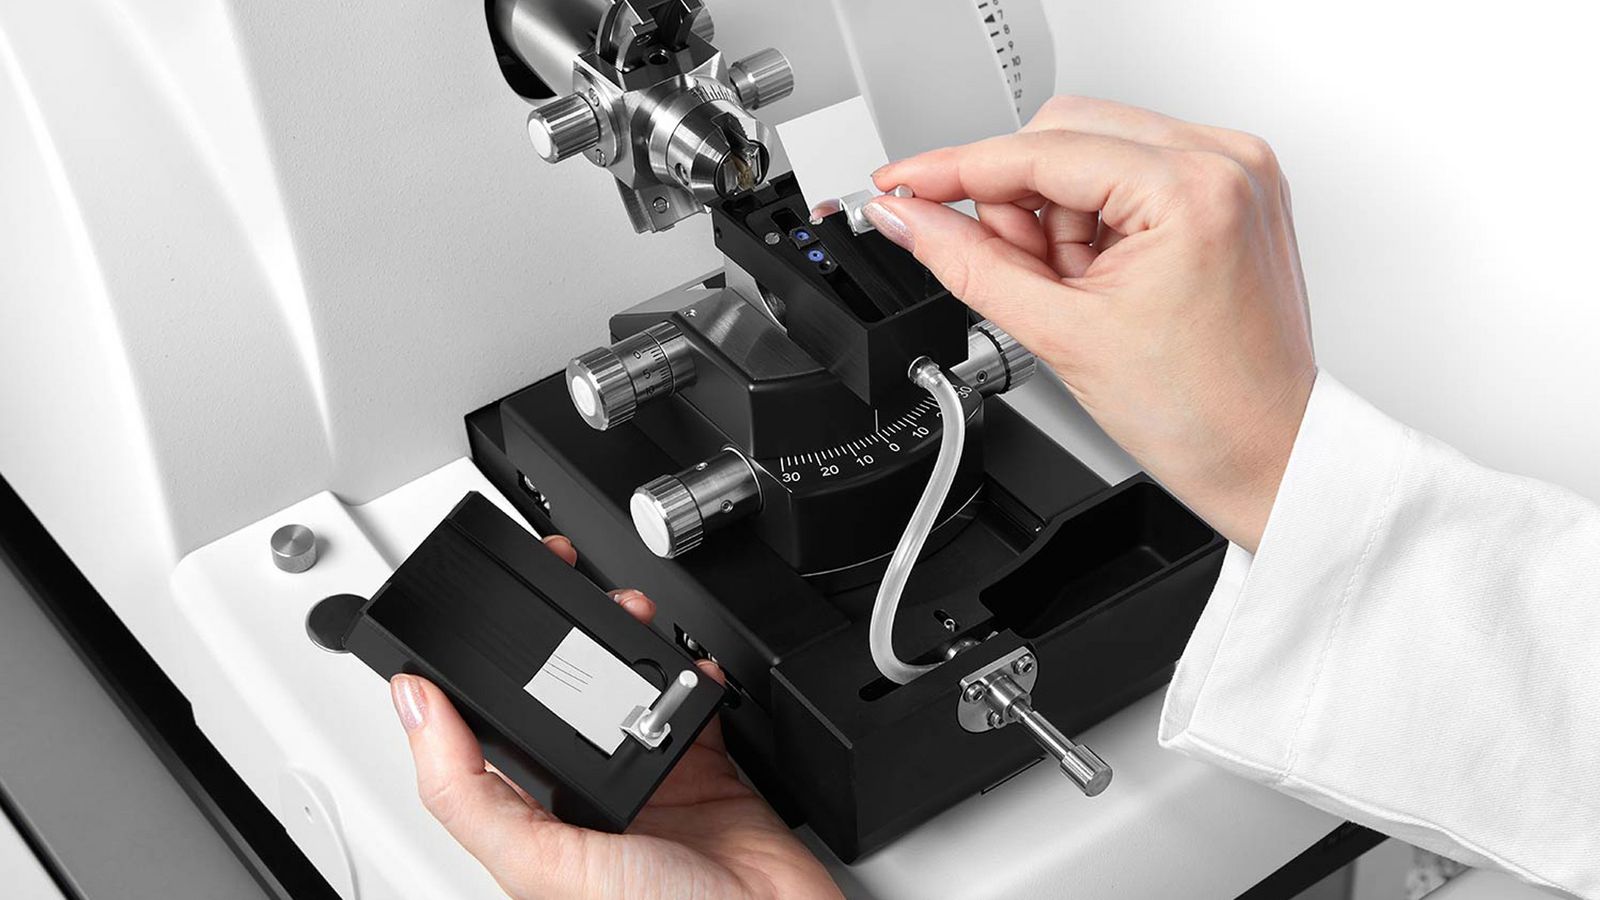
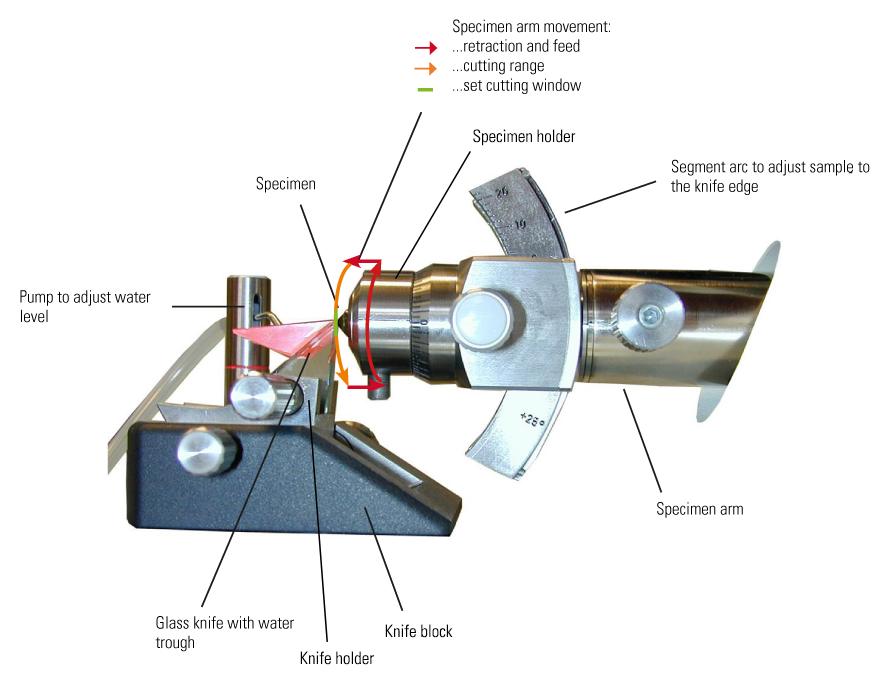
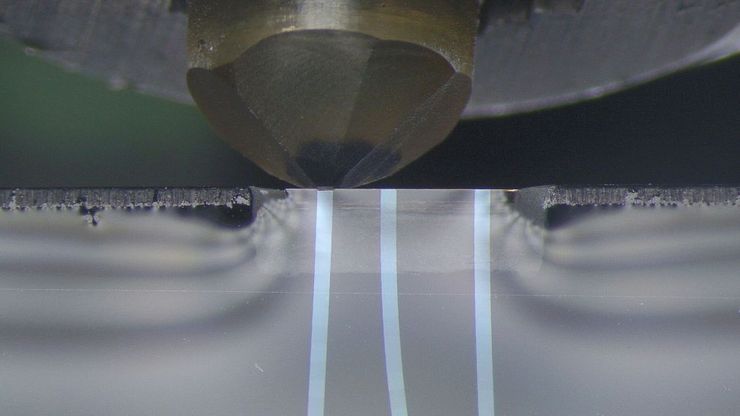
When sectioning with an ultramicrotome, the sample is inserted into an arm, mounted on special bearings, which performs a motorized vertical cutting movement. After the section has been cut and the specimen arm retracted, an extremely precise electromechanical feed moves the sample slightly forward by a set distance corresponding to the desired section thickness. The sectioning is performed by a vertical movement of the specimen over the extremely sharp blade of a fixed glass or diamond knife. Removing the sections directly from the knife blade is difficult, because they are so thin. They are, therefore, collected from the surface of the water bath (or with the help of a micromanipulator for the case of cryo-sectioning) after the sectioning procedure. Any further preparation can then be done that may be needed before examination with electron microscopy (EM).


Related articles
Ultramicrotomy eBook: Targeting, Trimming & Alignment

Integrated Serial Sectioning and Cryo-EM Workflows for 3D Biological Imaging

Ultramicrotomy Techniques for Materials Sectioning
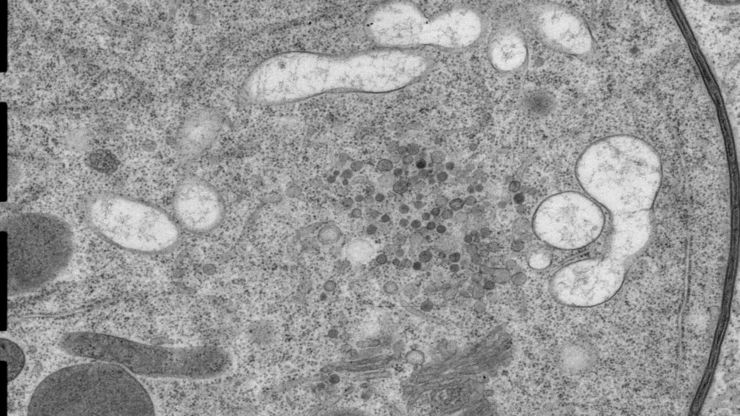
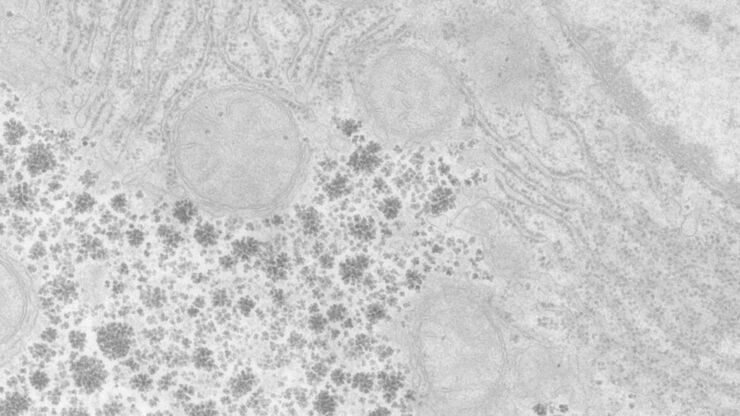
 stained with osmium tetroxide (OsO4), sectioned with a DIATOME diamond knife at room temperature, and then imaged with HAADF TEM.")
Perusing Alternatives for Automated Staining of TEM Thin Sections
Brief Introduction to Glass Knifemaking for Electron and Light Microscope Applications

Brief Introduction to Contrasting for EM Sample Preparation

Specimen preparation for array tomography
To prepare soft biological specimens for AT, several steps are required. These steps include:
- Tissue fixation
- Specimen extraction and resin embedding
- Serial sectioning and section ribbon collection, forming a section array
- Staining of sections for imaging, if needed.
Then the section array is imaged with SEM or LM (often fluorescence). Afterwards, the section images from the array are merged together for 3D image reconstruction and analysis.
With many ultramicrotomes, AT sample preparation has several time-consuming and cumbersome manual steps. An advanced ultramicrotome, such as the advanced UC Enuity ultramicrotome from Leica Microsystems can speed up the preparation process by automating specimen sectioning and minimizing the time required to align the sections for SEM or LM imaging.
For more information about ultramicrotomy and array tomography, please refer to the related articles shown below.

Related articles
Improve Cryo Electron Tomography Workflow
Brief Introduction to Specimen Trimming

High Quality Sectioning in Ultramicrotomy
Immersion Freezing for Cryo-Transmission Electron Microscopy: Applications

Ultramicrotomy & Cryo-Ultramicrotomy
Whether tissue sample, polymer, rubber, metals or nanoparticles, Leica ultramicrotomes provide extremely thin sections and perfect surface quality in a wide range of applications. From materials science to cancer research, our ultramicrotomes are used for many different kinds of research and quality control all over the world.
No-compromise ergonomics
Users often operate an ultramicrotome for a long period of time. Therefore, fatigue-free operation is a must for both right- and left- handed users. Ergonomic arm rests and generous adjustment options make working with ultramicrotomes from Leica Microsystems more comfortable.
Nanometer precision
Leica ultramicrotomes guarantee precision and comfort. Thanks to the fully motorized knife stages and a wealth of technical features, even beginners can prepare perfect sections. Make perfect glass knives for perfect ultrathin sections with the EM KMR3 within minutes.
The instruments produce section thicknesses between 10 nm up to 15 µm. Discover the precision mechanics of Leica ultramicrotomes and enjoy highest quality specimen preparation for LM, TEM, SEM, or AFM examination.
Introduction: Importance and Benefits of Automation in Ultramicrotomy
Automation in ultramicrotomy is crucial for enhancing the precision, efficiency, and reliability of sample preparation. As scientific research demands increasingly detailed and accurate analyses, the need for advanced tools that can streamline and optimize the preparation process becomes more evident.
Automated systems reduce the reliance on manual interventions, which can be time-consuming and prone to errors. By integrating automation, researchers can achieve consistent, high-quality sections with minimal effort, allowing them to focus more on analysis and interpretation rather than the intricacies of sample preparation.
The state-of-the-art ultramicrotome UC Enuity offers you following advanced tools:
Automatic Knife Alignment
Automatic knife alignment ensures that the sample and knife are perfectly positioned in relation to each other reducing the need for manual adjustments. This saves time and minimizes errors, ensuring consistent and high-quality sections, even for unexperienced users.
Automatic Trimming
Automatic trimming allows samples to be quickly and efficiently trimmed to a specific block face size. This simplifies the preparation of samples for sectioning and significantly reduces the workload.
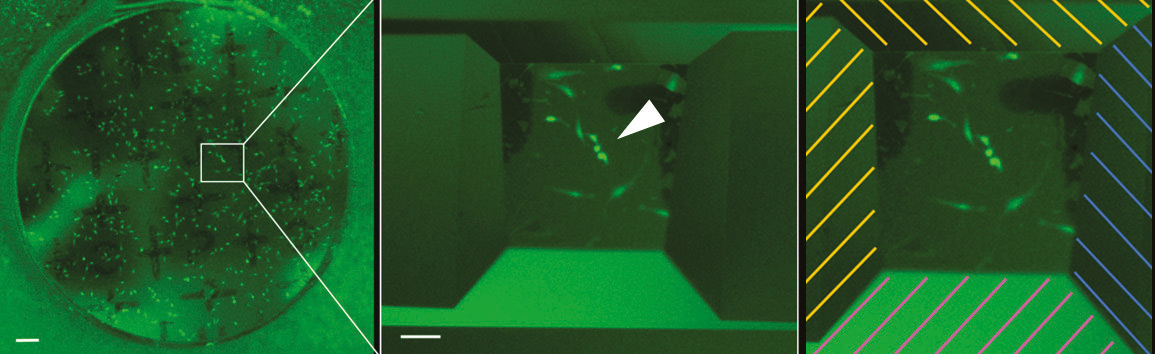
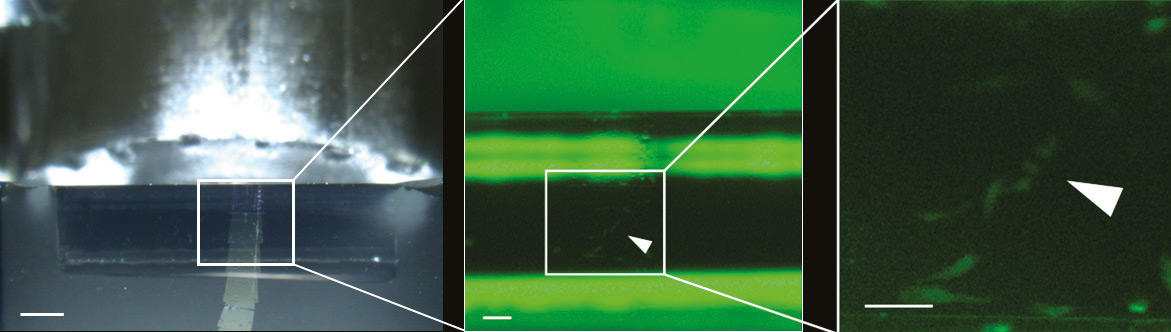
Trimming with the help of fluorescence
UC Enuity can be equipped with a motorized fluorescence stereo microscope. With the help of in-resin-fluorescence cells, tissue and other fluorescent specimens can be obtained automatically in a block face. Futhermore, using fluorescence the presence of the target in the sections can be proven during sectioning.
Target plane trimming using 3D Micro-Computed Tomography data (µCT)
Target trimming enables fast and precise trimming towards a target plane in the embedded sample without the need to create, transfer and check semithin sections during the approach of the target. This feature improves the efficiency of sample preparation and reduces time to result.
3D µCT data can be loaded into the UC Enuity's software workflow to define the target plane interactively. UC Enuity automatically configures knife and sample and automatically approaches the plane of interest.
Automation for volume EM
UC Enuity provides a specific serial sectioning knife, that can be aligned automatically to the block face of the sample. Together with the software workflow users are supported to perform serial sectioning with higher reliability and efficiency.
These innovative techniques make the UC Enuity an indispensable tool for modern research laboratories, helping to maximize the efficiency and accuracy of scientific work.
Related articles
Improve Your Ultramicrotomy Workflow with Automated Sectioning

Frequently asked questions Ultramicrotomy
Import 3D µCT data, define the plane you want to reach, and use guided trimming to remove excess resin and expose the target plane. UC Enuity supports accurate 3D target trimming based on µCT data, helping reduce trial-and-error when targets are buried in resin. This can help you start downstream 3D volume acquisition closer to where it matters for volume EM workflows.
Cryo planing is controlled surface trimming or polishing at cryogenic temperatures to remove contamination, reduce ice artifacts, and expose regions of interest. It also helps achieve smoother surfaces and improve resolution of fluorescence imaging for better correlation of light and electron microscopy.
In CEMOVIS, you require a small blockface because of the mechanics and physics of cutting vitrified water, not because of imaging constraints. A large block face increases cutting artefacts and makes high‑quality vitreous sections essentially impossible. Therefore, fluorescence targeting is especially powerful for CEMOVIS because it lets you precisely identify the correct position in your sample.
Yes. UC Enuity supports fluorescence-guided trimming and sectioning so you can follow fluorescent signals during preparation and reach regions of interest with fewer detours. Fluorescence monitoring is available at room temperature and under cryo conditions when used with the M205 FA stereomicroscope, supporting correlative workflows by helping target labeled regions efficiently for downstream electron microscopy preparation.
Automated alignment makes critical setup steps easier to teach and repeat across changing users. UC Enuity automatically aligns block face and knife, supported by an integrated camera and large on-screen interface so trainers and trainees can follow actions together. Motorized micro-step adjustments (knife angle, sample tilt, and rotation) support controlled fine alignment, helping users start sectioning with more confidence and consistency.
Automated trimming helps standardize block-face preparation for smoother sectioning and easier pickup. With UC Enuity, define boundaries once and use AutoTrim to shape a rectangular or trapezoid block face in a single run, supporting parallel edges that help ribbon formation and reduce hands-on time for standard trimming tasks. A clean block face can also help protect diamond knives before sectioning.
Ultramicrotomy produces ultrathin sections commonly used for TEM and SEM-based volume workflows such as array tomography. Typical section thickness is ~50–300 nm for TEM, while SEM array tomography typically requires sections below 50 nm.
To transfer ultrathin sections from an ultramicrotome to a grid for electron microscopy, the following steps should be followed:
- Prepare grids: ensure your TEM grids are clean, and glow-discharged for hydrophilicity if needed.
- Section collection: allow the ultrathin sections to float on water to ensure they are kept intact.
- Grid placement: gently dip your TEM grid in the water and pick up the sections from below.
- Grid lifting: carefully lift the grid with forceps, ensuring the sections adhere to the grid.
- Examine and store: check sections under a light microscope, and if needed, store the grids appropriately.
The key distinction between an ultramicrotome and a standard microtome lies in the thickness of the sections they produce and their respective applications in biological research. While a standard microtome is versatile for generating thicker sections suitable for routine histology and light microscopy, an ultramicrotome is designed specifically to create ultrathin sections, down to the nanometer scale, intended for a range of advanced microscopy techniques such as transmission electron microscopy (TEM). The ultramicrotome utilizes a glass or diamond knife and requires the specimens to hardened for precision and stability during sectioning. Hardening can be achieved through freezing and/or embedding in resin and is essential for achieving the high-resolution imaging necessary to study intricate subcellular structures in detail.
Import 3D µCT data, define the plane you want to reach, and use guided trimming to remove excess resin and expose the target plane. UC Enuity supports accurate 3D target trimming based on µCT data, helping reduce trial-and-error when targets are buried in resin. This can help you start downstream 3D volume acquisition closer to where it matters for volume EM workflows.
Cryo planing is controlled surface trimming or polishing at cryogenic temperatures to remove contamination, reduce ice artifacts, and expose regions of interest. It also helps achieve smoother surfaces and improve resolution of fluorescence imaging for better correlation of light and electron microscopy.
In CEMOVIS, you require a small blockface because of the mechanics and physics of cutting vitrified water, not because of imaging constraints. A large block face increases cutting artefacts and makes high‑quality vitreous sections essentially impossible. Therefore, fluorescence targeting is especially powerful for CEMOVIS because it lets you precisely identify the correct position in your sample.
Yes. UC Enuity supports fluorescence-guided trimming and sectioning so you can follow fluorescent signals during preparation and reach regions of interest with fewer detours. Fluorescence monitoring is available at room temperature and under cryo conditions when used with the M205 FA stereomicroscope, supporting correlative workflows by helping target labeled regions efficiently for downstream electron microscopy preparation.
Automated alignment makes critical setup steps easier to teach and repeat across changing users. UC Enuity automatically aligns block face and knife, supported by an integrated camera and large on-screen interface so trainers and trainees can follow actions together. Motorized micro-step adjustments (knife angle, sample tilt, and rotation) support controlled fine alignment, helping users start sectioning with more confidence and consistency.
Automated trimming helps standardize block-face preparation for smoother sectioning and easier pickup. With UC Enuity, define boundaries once and use AutoTrim to shape a rectangular or trapezoid block face in a single run, supporting parallel edges that help ribbon formation and reduce hands-on time for standard trimming tasks. A clean block face can also help protect diamond knives before sectioning.
Ultramicrotomy produces ultrathin sections commonly used for TEM and SEM-based volume workflows such as array tomography. Typical section thickness is ~50–300 nm for TEM, while SEM array tomography typically requires sections below 50 nm.
To transfer ultrathin sections from an ultramicrotome to a grid for electron microscopy, the following steps should be followed:
- Prepare grids: ensure your TEM grids are clean, and glow-discharged for hydrophilicity if needed.
- Section collection: allow the ultrathin sections to float on water to ensure they are kept intact.
- Grid placement: gently dip your TEM grid in the water and pick up the sections from below.
- Grid lifting: carefully lift the grid with forceps, ensuring the sections adhere to the grid.
- Examine and store: check sections under a light microscope, and if needed, store the grids appropriately.
Match sample hardness and modality to knife geometry and workflow. Use dedicated diamond trim knives to create orthogonal edges; for routine RT biological ultramicrotomy in epoxy, a 45° diamond knife with a clean water boat supports stable ribbons. For polymers, ensure the knife is specified for dry or cryo cutting as needed; not all edges perform equally at cryo. Integrate ionization for static control (especially thin ribbons). Stock LR White/Lowicryl HM20 if IRF/CLEM is in scope; keep UV‑curable resin on hand to stabilize small polymer volumes. Plan collection tools (eyelash, loops with sucrose) and AT‑grade knives/boats for array tomography on wafers. Finally, schedule routine knife inspections and establish a block‑face size window (e.g., 250–1200 µm) compatible with automated alignment. Document these mappings in a one‑page SOP so core facilities and industry labs can forecast consumables and maintain reproducibility across operators.
Automated trimming and automated alignment can meaningfully improve ultramicrotomy workflows by reducing the dependence on repetitive manual adjustments and operator‑specific technique. Automation helps standardize steps that traditionally vary widely between users, which supports more consistent preparation of samples across sessions, projects, and operators. Automated trimming assists users by defining trimming steps in a structured, repeatable way. This reduces the need for continual manual correction and helps users move toward their target region more efficiently, whether they are preparing samples for transmission EM, serial sectioning, or volume EM workflows. By minimizing operator‑dependent variability, automated trimming can streamline early‑stage preparation and make the workflow easier for less‑experienced users. Automated alignment complements this by guiding users through the process of bringing the block face and knife into a suitable orientation for sectioning. Instead of relying solely on the operator’s experience to make small, iterative adjustments, automation helps reduce setup effort and can lower the learning curve for new users. This contributes to more reproducible sectioning conditions and helps maintain consistent quality over time. Together, automated trimming and automated alignment help laboratories achieve smoother setup, more predictable workflows, and sectioning quality that is less sensitive to individual technique. This consistency is particularly valuable in multi‑user or high‑throughput environments and supports more reliable results across a variety of EM applications.
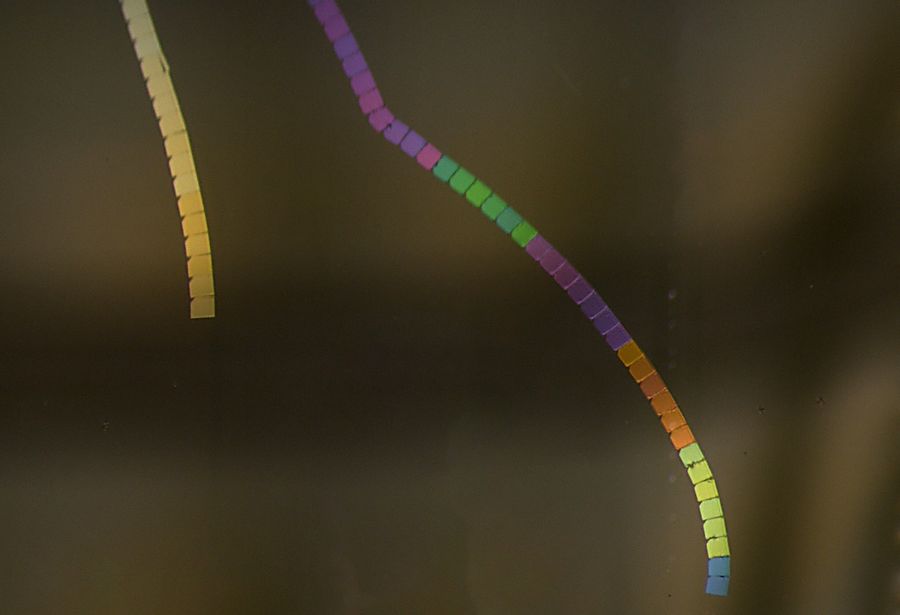
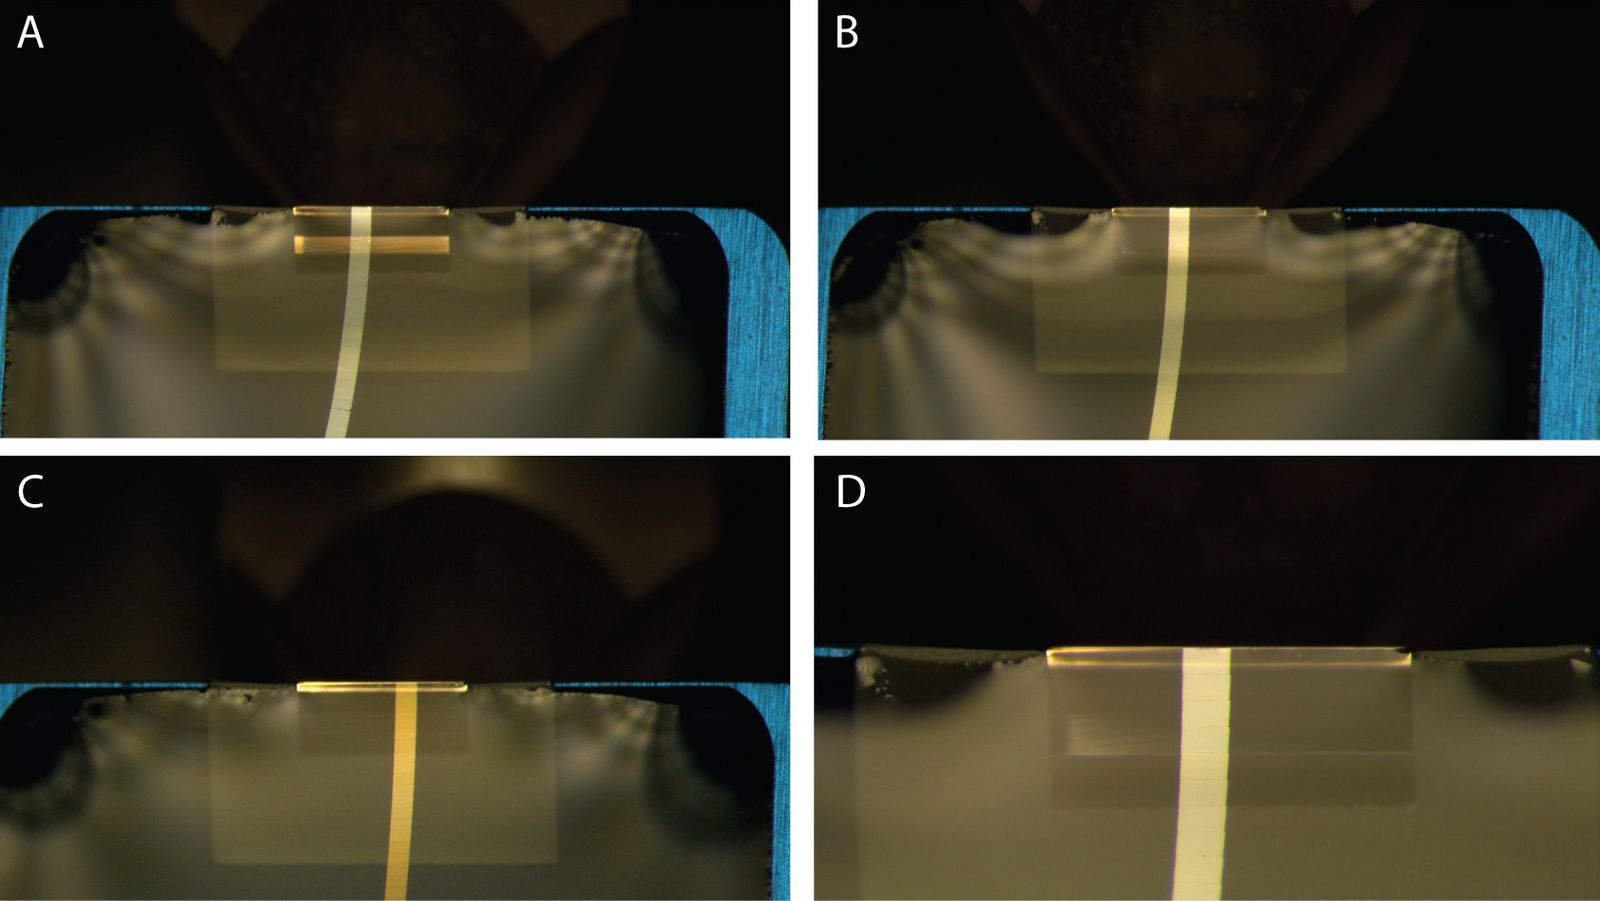
Interference colors visible on the floating section provide a fast, intuitive gauge of thickness. As a rule of thumb, silver ≈ ~50 nm, shading to gold ≈ ~100 nm, with thicker sections (>100 nm) displaying progressive color shifts. Use this as a live feedback loop: set the ultramicrotome feed (e.g., 50/70/100 nm) and confirm the hue under uniform illumination; then fine‑tune cutting speed to sharpen edges and maintain ribbon stability. Because resin, illumination, and optics can influence perceived hue, establish a local calibration: collect a short series at known feed steps (e.g., 50, 70, 100 nm), image them, and build a color‑to‑thickness reference for your facility. Incorporate the color strip near the station and in training slides so new users can self‑calibrate. Establishing a consistent illumination setup helps operators judge interference colors more reliably, supporting reproducible section thickness across users.
Use material behavior and experimental goals as gatekeepers. For polymers, the primary criterion is the glass‑transition temperature (Tg): cutting below Tg preserves morphology and reduces compression; soft elastomers and unstained polyolefins often require cryo, while harder materials (e.g., PMMA) can be sectioned at room temperature. Embedding small or fragile polymer volumes in a UV‑curable resin can stabilize handling without obscuring lamellae; phase‑contrast TEM can recover detail even in low‑contrast, unstained sections. For biologicals, preserve fluorescence labels by combining HPF/FS with acrylic resins (e.g., LR White, Lowicryl HM20) and minimal heavy metal concentrations when IRF targeting is needed for CLEM; otherwise, standard epoxy + contrasting may be preferred for non‑fluorescent workflows. When the region of interest is buried deep, favor micro‑CT‑guided trimming to minimize sacrificial cuts. In all cases, pair the decision with autoalignment to ensure thin, artifact‑free ribbons regardless of modality.
Stable sections start with the environment. Aim for a low‑vibration bench or anti‑vibration table and avoid direct adjacency to centrifuges, fume‑hood blowers, or high‑traffic doors. Keep temperature stable (typically ~20–23 °C) and avoid drafts across the water boat — turbulent air alters ribbon behavior and the perceived light gap. Provide controlled, even illumination to read interference colors reliably during thickness adjustments. For electrostatic effects, integrate an ionizer near the knife/boat to stabilize ribbons and reduce “fly‑away” behavior; this is particularly helpful in dry or heated rooms and is supported in UC Enuity workflows. Finally, standardize a short pre‑cut checklist: (1) verify block‑face geometry (orthogonal edges), (2) confirm knife integrity and angle, (3) camera‑guided autoalignment (tilt/rotation/knife angle) to a uniform blue light gap, then (4) set feed/speed to your target thickness using interference color as a live readout. Taken together, these controls lower operator‑to‑operator variability and improve serial ribbon yield for array tomography and volume EM.
Ultramicrotomes offer several advantages, making them essential tools for high-resolution imaging in various scientific fields. They produce ultra-thin sections, typically between 20 and 150 nanometers thick, which allow for detailed visualization of internal structures at nanometer scale resolution. Another significant advantage is the versatility of ultramicrotomes. They can be used to prepare sections from a wide range of materials, including biological specimens, polymers, metals, and ceramics. Furthermore, the process of ultramicrotomy is relatively fast and efficient, producing clean sections with minimal artifacts. This efficiency is beneficial for researchers who need to prepare multiple samples quickly.
Cutting ultrathin sections using an ultramicrotome involves several precise steps (typical steps for room temperature applications are explained in the following). First, the sample has to be fixed, dehydrated and embedded in resin to provide mechanicyl support. Then the sample is trimmed to expose a flat, smooth block face. After mounting the trimmed block onto the ultramicrotome, the block face is sectioned perpendicularly to the knife edge. Sections are typically collected in a water boat for facilitated pick up on a TEM grid.
In ultramicrotomy, glass knifes and diamond knives are use. In particular diamond knives are commonly used due to their exceptional sharpness and durability.
- Types: There are various types of diamond knives designed for different applications, including standard ultramicrotomy, cryo ultramicrotomy (wet and dry), and material science
- Angles: Diamond knives come in different angles, typically 35°, 45°, and 55°, to suit various sectioning needs.
- Sizes: The diamond edge lengths can range from 1 to 7 mm, depending on the specific requirements
A cryo ultramicrotome is a specialized type of ultramicrotome designed to cut ultra-thin sections of specimens at very low temperatures, typically between -20°C and -150°C. It is particularly useful for preparing frozen biological specimens. Cryo ultramicrotomy helps to preserve the native structure and composition of biological samples, which otherwise can be altered by chemical fixation and dehydration.
While ultramicrotomes are invaluable for preparing ultra-thin sections for transmission electron microscopy (TEM), they do have some disadvantages:
- Complexity: Operating an ultramicrotome requires specialized training and expertise, which can be overcome by automated approaches.
- Time-Consuming: The preparation process of samples can be very time-consuming
- Sample Damage: There is a risk of damaging delicate samples during sectioning.
- Limited Sample Size: Only small samples can be sectioned, which may not be representative of the entire specimen.
Despite these challenges, the high-resolution imaging capabilities provided by ultramicrotomy make it an essential tool in many scientific fields.
The main difference between a microtome and an ultramicrotome lies in the thickness of the sections they produce and their applications: While the microtome is used to cut thin slices of biological tissues typically of a few micrometers for light microscopy, the ultramicrotome is designed to cut ultra-thin sections (50-100 nm thin) for transmission electron microscopy (TEM).
The key distinction between an ultramicrotome and a standard microtome lies in the thickness of the sections they produce and their respective applications in biological research. While a standard microtome is versatile for generating thicker sections suitable for routine histology and light microscopy, an ultramicrotome is designed specifically to create ultrathin sections, down to the nanometer scale, intended for a range of advanced microscopy techniques such as transmission electron microscopy (TEM). The ultramicrotome utilizes a glass or diamond knife and requires the specimens to hardened for precision and stability during sectioning. Hardening can be achieved through freezing and/or embedding in resin and is essential for achieving the high-resolution imaging necessary to study intricate subcellular structures in detail.
Ultramicrotomy is primarily used for preparing ultra-thin sections of specimens (50 -100 nm) for transmission electron microscopy (TEM). This technique allows scientists to visualize and analyze the internal fine structures of samples at nanometer scale resolution.
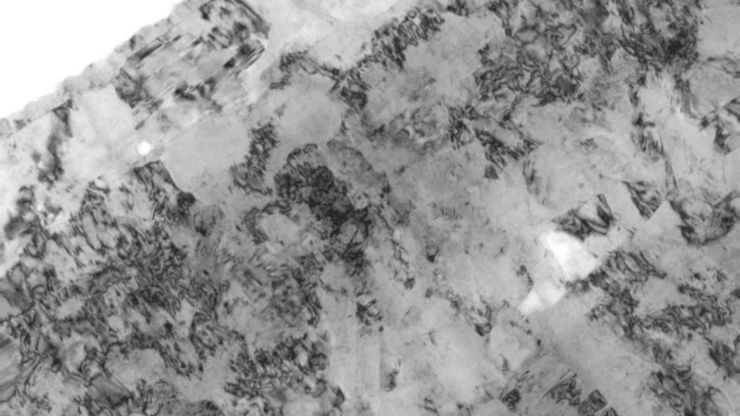
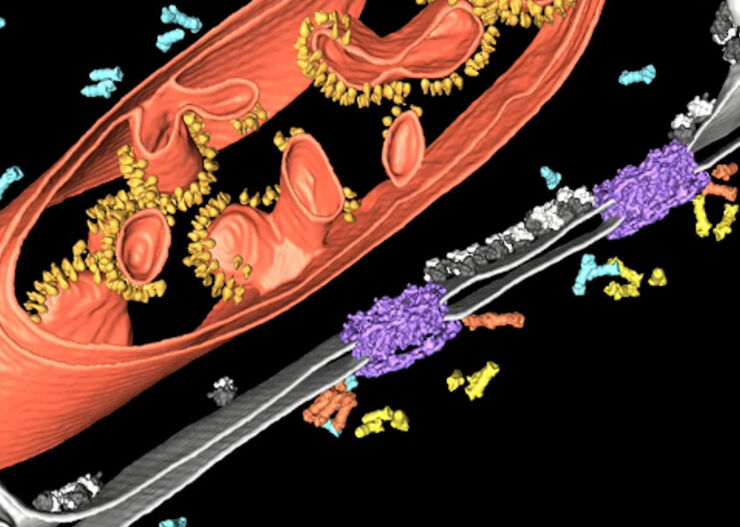
 embedded in bulk vitreous ice (blue).")

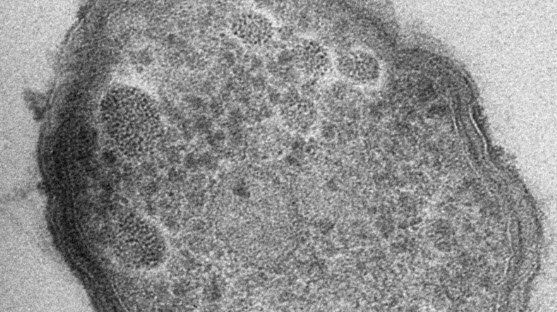
, insulin SGs (orange), microtubules (red), nucleus (yellow), and plasma membrane (transparent).")

